General
What is the RIS?
The RIS (Research Infrastructure Services) is Washington University’s array of centrally managed high performance computing clusters and storage services. It is designed for faculty and staff who need access to high performance computing resources and storage for large data sets.
How do I sign up for compute and storage at the RIS?
Pre-requisites
- your WUSTL Key ID and password
- a departmental WorkDay Cost Center Number
- You will need to be connected to the WashU network either by being physically on campus or by using a WashU VPN connection.
You can now request new services by opening a Service Desk Ticket.
- Select Request Support
- Login with your wustl key
- Select Scientific Compute platform (left menu) then Activate Compute Services
If you have not requested access to storage in the past then the 5TB of space will be allocated when your compute account is set up.
QUICKSTART GUIDE FOR RIS COMPUTE
General information on the Scientific Compute and Data Storage platforms can be found on the RIS website.
If you have any questions, email Jonathan Rapkin (rapkin@wustl.edu) or Frances Thuet (thuet@wustl.edu).
How do I get access to the A&S condo?
When signing up for a RIS compute account mention in the comment section that you would like to be added to the Artsci condo. If you have already set your account up just email Frances Thuet (thuet@wustl.edu) or Jonathan Rapkin (rapkin@wustl.edu) to request access.
What resources are available through the A&S condo?
The A&S Condo consists of a number of nodes containing more than 500 cores, 8TB RAM and 8 NVIDIA Ampere A100, PCIe, 80GB GPUs.
How do I request to be added to the A&S storage?
For access to the A&S storage space, email Frances Thuet (thuet@wustl.edu) or Jonathan Rapkin (rapkin@wustl.edu). Since the A&S storage space is a shared resource, space will be allocated in an equitable manner across Arts & Sciences.
Storage
How do I access my storage? (from Mac, Windows, Linux)
Once your storage is set up you can connect to your storage via several methods. SMB is probably your best bet if you are on campus. Instructions on how to connect via SMB can be found below.
On Windows 10
Connect to the WUSTL network, either on-campus (encrypted, not guest wireless) or via a WashU VPN.
Open Windows File Manager / Windows Explorer: Start > Computer (or My PC)
Right click on Computer (or My PC) > Map network drive
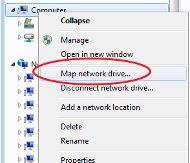
Select the desired drive letter using the "Drive" drop down menu
In the "Folder" text box, type \\storage1.ris.wustl.edu\PI WUSTL Key or Share Name
Check the "Reconnect at logon" box if you wish to create a persistent link
Check the "Connect using different credentials" box
Click Finish

Enter the phrase "accounts\<your wustlkey>" (replace <your wustkey> with your own WUSTL Key) and your WUSTL password to log in. For example, if your WUSTL key is jsmith, you would enter accounts\jsmith in the username section.
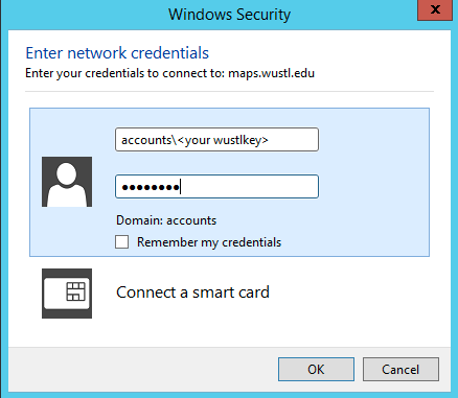
After you enter your username and password, your storage should now be visible alongside your C drive
On a Mac
1) Connect to the WUSTL network, either on-campus (encrypted, not guest wireless) or via a WashU VPN.
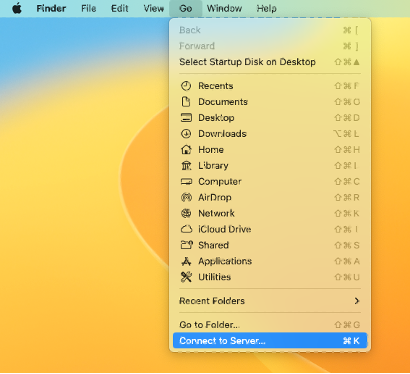
2) Open Finder > Go > Connect to Server
3) Enter the server address: \\storage1.ris.wustl.edu\PI WUSTL Key or Share Name
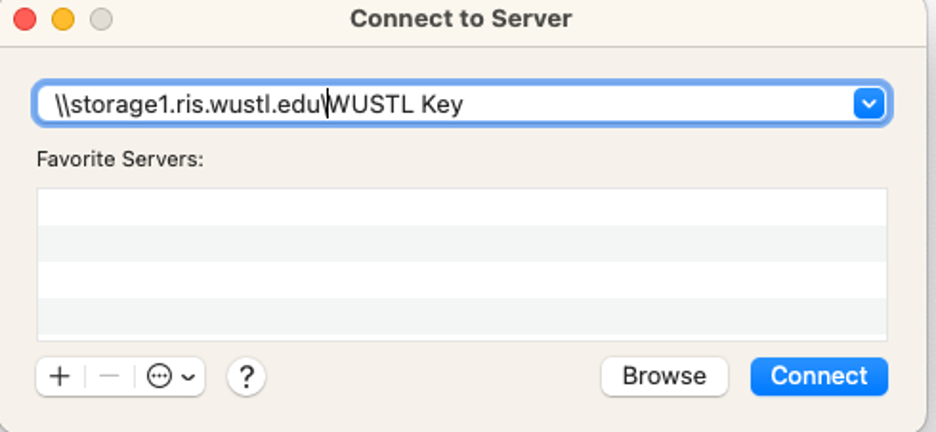
4) When prompted, connect as Registered User. Enter your WUSTL credentials:
Name: accounts\<wustl key> (Replace <wustl key> with your own WUSTL key)
Password: your WUSTL password
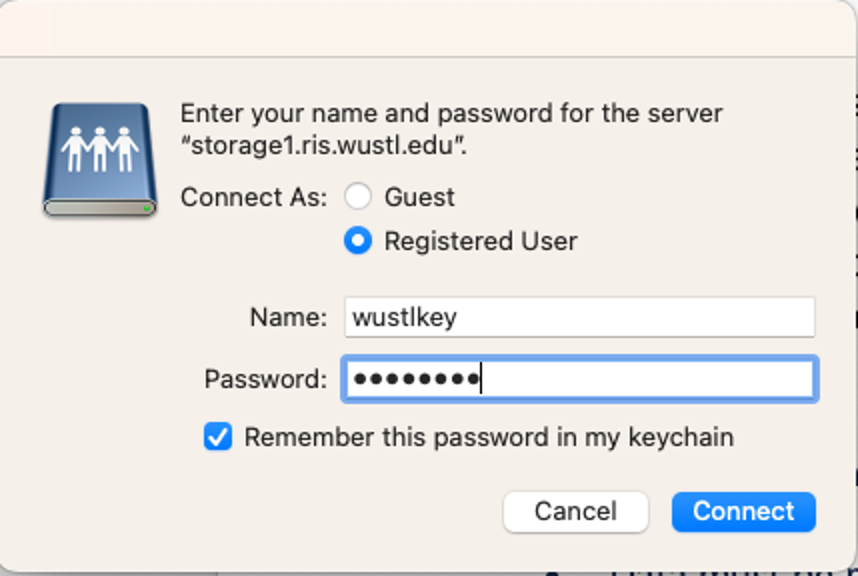
The shared drive will now appear as a mounted drive in Finder and on the Desktop. Double click on it to open it like a regular hard disk.
What are the storage tiers?
There are two key types of storage on the RIS condo, active and archive.
The Active Tier is the standard storage tier you get by default. It is serviced by a number of different storage pieces including fast memory caching etc., but a helpful way to think of it is “Active storage is where I do daily work”.
The Archive Tier is where you put things for long term storage.
The Scratch Space is for temporary files only.
What is the best way to transfer data to my RIS storage?
- If you are working with relatively small datasets on campus, SMB is your best bet for transferring data to and from the RIS.
- Globus is a cyberinfrastructure primarily used for transferring data between institutions.
How do I activate archive and how much space do I get?
You just need to request the archive tier by putting in a ticket to RIS service desk. You will get as much archive space as you request.
What is scratch space and how do I access it?
Scratch space is considered a “global temporary space.” Users should not store their only copy of data in scratch. Scratch space is available at /scratch1/fs1/${COMPUTE_ALLOCATION}. Here are some tips:
Data must be manually put into /scratch.
The setgid bit is set at /scratch1/fs1/${COMPUTE_ALLOCATION}, all contents should have group set to ${COMPUTE_GROUP}.
The /scratch space has quotas set based on compute-group membership (as opposed to fileset quotas, that are in place on storage1).
Your ${COMPUTE_GROUP} will have a default quota of 5% of your storage allocation size, but no less than 1Tb.
Exceeding the quota will trigger a denial after which no further writes will be allowed until your ${COMPUTE_GROUP} removes data and goes below the quota.
Files and directories will be automatically deleted from /scratch when their last modified date (mtime) is older than the LSF job run limit, currently 28 days.
Weekly usage reports are currently written to each scratch directory in a file called RIS_Usage_Report.txt
When files are deleted, the list of deleted files will be written to a scratch directory in a file called RIS_cleanup_policy.{labname}
Is my storage backed up?
Yes.
The backup policy for both Active and Archive data has been fully vetted and approved by the Office of the Vice Chancellor for Research and the Office for Information Security and the research storage infrastructure has been deemed compliant with all data retention guidelines.
Facts and figures about back up procedures:
- Integrated into the storage environment is a high-performance and scalable tape robot that manages a tape library of 18 petabytes, which allows the shuttling of data from live disk to much less expensive tape and back again on demand.
- For both Active and Archive filesets, data remains on tape indefinitely unless it has been deleted on disk. Active data remains on tape for 90 days after the data has been deleted from disk.
- If the data is never deleted from disk, then it remains on tape indefinitely with incremental backups.
- Data in Archive also remains on dual copy tape indefinitely unless it is deleted, then it remains on tape for 10 days.
- The research storage environment also offers self-service, snapshot data recovery for 7 days.
- The preferred method of completed project retention is to request an Archive allocation and once a project is completed, the data can be moved from Active to Archive.
- If the data needs to be accessed again after moved to Archive it can migrated back to Active, and it will be restored from tape to disk.
- The preferred method of moving data between Active and Archive is to use tar or zip the data and use rsync for movement.
Check Storage Usage
An accurate report of your groups Storage Service Allocation's space consumption can only be obtained through the Storage Service SMB interface. (This is a known limitation of the storage service.)
SMB Interface
The easiest and most accurate way to report disk usage for your allocation is to mount the allocation on your desktop (see FAQ above about mounting your storage). To look at usage from Windows:
In Windows Explorer browse to the network share, right click and select properties.
Mac OS:
Mount your storage allocation using the instructions in the FAQ for mounting storage located above. Once mounted find the connected server on your desktop, highlight, and click Command and i keys.
RIS Home Directory (Compute Users Only)
Note: The Compute Service home directories and Scratch Space are not accessible from outside of the Compute Platform. Data should be staged to these locations from a Storage Service Allocation, and computational result or job output data should then be staged back to a Storage Service Allocation.
Every compute service user is assigned a limit of 9GB of home directory space on the Compute Platform. This space is restricted at the user level, and can only be checked with the appropriate mmlsquota command:
mmlsquota -u Username cache1-fs1:home1
Compute Service Scratch Space (Compute Users Only)
High-performance Scratch Space is typically allocated for each lab as it is onboarded to the Compute Service. This space is restricted at the group level, which should represent an eponymous lab. Because it is a shared device like that for home directories, this usage must also be inspected with the appropriate mmlsquota command, referencing a group name and group quota on the scratch device:
mmlsquote -g compute-yourgroup scratch-fs1
Compute
How do I sign into compute using the command line?
NOTE:
If you are off campus, you must use VPN. VPN which stands for virtual private network, establishes a digital connection between your computer and a remote server creating a secure tunnel that encrypts your data, masks your IP address and lets you sidestep the university firewall and website blocks. It is available to all faculty, staff and students at the university. Instructions for accessing the WashU VPN can be found at
https://it.wustl.edu/items/connect/
Signing into your RIS account:
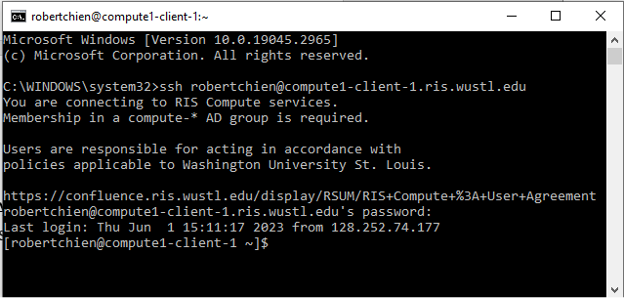
To use the command line to sign into your RIS account:
Use Secure Shell Protocol (SSH) to sign into compute
This requires command line access.
Windows users should download and install Putty (https://www.putty.org/) while Mac users should use the terminal application in the Applications -> Utilities folder.
Each user account is represented by the user’s WUSTL Key ID, and users belong to compute groups (needed to access storage and submit jobs)
For example:
ssh YourWUSTLKeyID@compute1-client-1.ris.wustl.edu
What program do I use to connect to my RIS compute account?
- ssh Windows (putty) https://www.putty.org/
- ssh on a Mac use terminal (the terminal application can be found under the Applications/Utilities folder).
Can I use a web browser to access the RIS compute platform?
Yes, you can connect to the RIS platform using OOD (Open on Demand)
How do I connect to Open on Demand (OOD)?
Open OnDemand (OOD) is an open-source tool that provides a web-based portal to high-performance computing resources. It allows users to access these resources directly from their browser, eliminating the need for complex terminal commands or advanced programming knowledge.
With OOD, you can:
- Access the RIS Compute Platform via a web browser.
- Use any number of supported applications or incorporate their own.
- Navigate the RIS Compute Platform and manage their computing needs through a Graphical User Interface (GUI), instead of using the command line.
Getting Started with Open OnDemand
1. Initial Setup: Before you can use OOD, you need to connect to the compute1 platform via SSH at least once. This step is necessary to set up your user home directory. If you're unsure how to do this, you can refer to the Compute Quick Start Guide.
- Open a terminal on your local machine.
- Type the following command and press Enter. Replace username with your actual username:
- ssh username@compute1.ris.wustl.edu
- You will be prompted to enter your password. Type your password and press Enter.
2. Log in: Once your home directory is set up, open your web browser, and enter the following URL: https://ood.ris.wustl.edu/pun/sys/dashboard. This will take you to the OOD login page. Enter your credentials to log in. (WUSTL Key & Password)*
*Note: Mac users should the browsers Chrome or Firefox. Safari not well supported by OOD.
Key Features of Open OnDemand
- Files: OOD allows you to view files and directories in your home directory. However, due to implementation restrictions, you cannot navigate to storage1 or scratch1 through this page.
- Jobs: With OOD, you can view active jobs and use the Job Composer to create scripts and launch batch jobs. The Job Composer allows you to create and launch batch jobs similar to using a .bsub job file. Here's a sample job file:
- Clusters: OOD allows you to launch command-line and batch jobs from a terminal session. You have access to all compute1 resources available from this client node.
- Interactive Apps: OOD allows you to run interactive jobs with a GUI. You can select an application name from the Interactive Apps dropdown, configure storage/scratch mounts and resource options for the job, and then select Launch to submit the job.
- My Interactive Sessions: This feature allows you to view pending and running interactive sessions. You can also terminate job sessions from this page.
- Terminal: OOD provides a terminal that is launched through the web-browser, allowing users to do command line work.
- File Directory
What are interactive apps and how do they work?
Interactive Apps in OOD are web-based applications that provide a user-friendly interface to interact with high-performance computing resources. These applications can range from data visualization tools, text editors, IDEs (Integrated Development Environments), to domain-specific applications like MATLAB, Jupyter notebooks, RStudio, etc.
How do they work?
When you launch an Interactive App in OOD, it starts a job on the compute resources, but instead of running a batch script, it starts a server process for the application. OOD then connects to this server and presents the application's GUI in your web browser.
How to use Interactive Apps in OOD
- Accessing Interactive Apps: From the OOD dashboard, click on the 'Interactive Apps' dropdown menu. You'll see a list of available applications. The exact list will depend on what your institution has installed and configured on their OOD instance.
- Launching an App: Click on the application you want to use. This will take you to a form where you can specify the resources you need (like number of cores, amount of memory, and runtime). Fill out the form and click 'Launch'. OOD will then submit a job to start the application.
- Using the App: Once the job starts, you'll see a 'Connect to My Server' button. Clicking this will open the application in a new browser tab. You can then use the application as if it were running on your local machine.
- Ending the Session: When you're done, you can close the application by closing the browser tab. To free up the resources, you should also go back to the OOD dashboard and click 'Delete' on the corresponding session under 'My Interactive Sessions'.
What statistical software packages are available via Open on Demand?
OOD is available for RStudio, Matlab, Sas, Stata, Relion3, and Jupyter Notebooks.
What is a Docker?
A Docker container image is a lightweight, standalone, executable package of software that includes everything needed to run an application: code, runtime, system tools, system libraries and settings.
A container image is built and pushed to a container registry for later use. In the RIS Compute Service, a user submits a job that is managed by the IBM Spectrum LSF job scheduler that, when executed, pulls the Docker container image to an execution node where it is executed on behalf of the user.
Why Docker?
In the past, HPC environments were built upon “static operating system images”, which is to say that each execution node of a cluster had the same Operating System Image, with a set of applications that were curated and installed by the managing IT team. Each application was therefore exposed to every application’s “dependency tree”. For example, if Application A required Library Z version 1, but Application B required Library Z version 2, the applications conflicted with each other. Various methods were devised over the years to try to isolate application environments from each other. The development of “modules” that would use environment variables and shared filesystems was an attempt to solve this problem. In the end, the modules and the environments needed to be built by the cluster managers. End users had limited ability, if any at all, to deploy the software they wanted “on the fly”.
Docker allows users to build their own software environments independently of anyone else. The cluster management team no longer needs to be the gatekeeper controlling the available software.
What is Docker Hub and how do I set up an account?
DockerHub is the official repository for Docker images. You can set up a free account at https://hub.docker.com/
What is the difference between Docker and Docker Hub?
DockerHub is the official container registry for Docker images.
What pre-built Dockers are available at the RIS?
There are a number of Docker repositories that offer prebuilt images. Docker Hub has the highest profile and hosts many thousands of images from thousands of publishers, but there are other repositories as well. It can be daunting to navigate all of the options.
In order to help new users get started, the RIS offers a list of RIS-vetted application containers as well as a short list of RIS-supported containers. The RIS-vetted containers are not maintained by the RIS, but have been curated from a number of repositories, including Docker Hub and Quay.io. The RIS list points to official documentation of the image, quotes a brief description of the software, and offers a brief example of how to submit a job that makes use of the image. This list may help you get going if you already know what software you want to use and you find it on the list. Many of these are images that offer domain-specific tools for working with genomic sequence data. Other images set up general-purpose programming languages such as Python, R, Julia, Java, Go, Perl, and .NET. A few images offer additional programming tools such as Anaconda and Jupyter with Python and RStudio and Shiny for R.
See a list of containers maintained by RIS
How do I launch jobs?
The RIS has detailed instructions on launching jobs at
https://docs.ris.wustl.edu/doc/compute/recipes/job-execution-examples.html
What is an interactive job?
Interactive - you can run commands and interact with your Docker as if you were working on your local computer's terminal.
For detailed information and job execution examples visit:
https://docs.ris.wustl.edu/doc/compute/recipes/job-execution-examples.html
How to submit a job at the RIS using the command line?
Example Script:
#Set up the environmental variables:
export LSF_DOCKER_VOLUMES="/scratch1/fs1/yourgroupname:/scratch1/fs1/head-marsden /storage1/fs1/yourgroupname/Active:/storage1/fs1/yourgroupname/Active"
#Start the Docker. -R is where you request the resources. Once the docker is started you will be able to run your job interactively. This example is submitting a docker for prebuilt docker cp2k to the artsci interactive queue.
bsub -G compute-yourgroupname-q artsci-interactive -R 'gpuhost' -gpu "num=1:gmodel=NVIDIAA10080GBPCIe" -Is -a 'docker(cp2k/cp2k)' /bin/bash