The WYSIWYG Editing Toolbar
The editing toolbar, also known as a WYSIWG (what you see is what you get), allows you to format text, embed multimedia, and create links in your website.

Text Formatting Options
Use this tool to make normal text bold. We do not recommend using bold text for headings.
Italics
Use this tool to italicize text
Text Alignment
Left or center aligns text
Bulleted and Numbered List
Use these to turn text into bulleted or numbered lists
Anchor Link
Use to add an anchor to link to
Superscript and Subscript
Use these to add a character that is slightly above or below the normal line of script.
Dividing Line
Use this to add a horizontal dividing line to separate blocks of text
Remove Format
Use this to remove the format from copy/pasted text
Headings
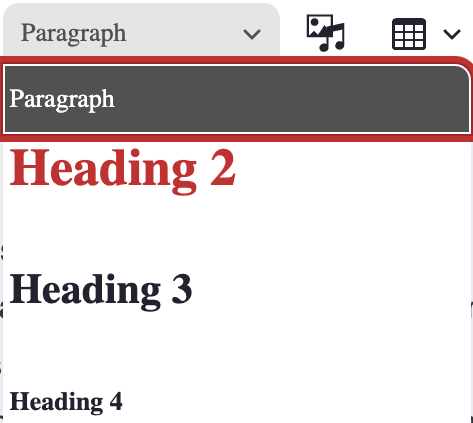
Use to select heading styles or normal paragraph text
Block Quote

This has been styled to be a larger font that is centered on the page and is set off by horizontal lines above and below the text.
This is a block quote.
Source Button

The source button will display the content within the WYSIWYG as plain text. This allows you to see what the section looks like without any graphics or formatting.
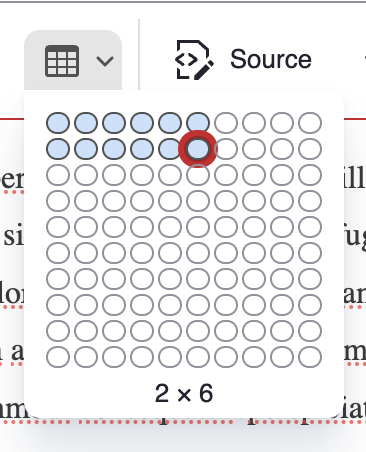
Adding a Table
Click the Table icon to add a new table and choose the number of columns and rows you will need.
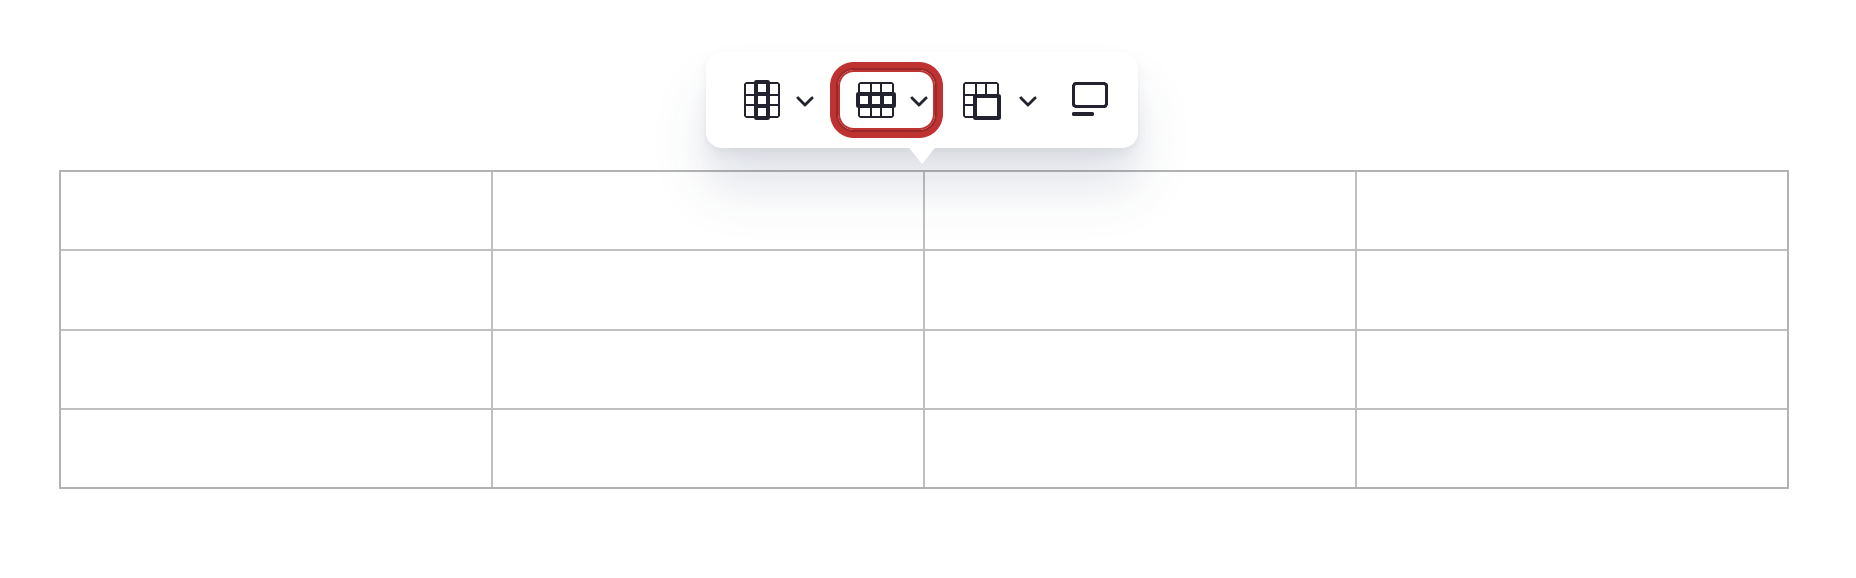
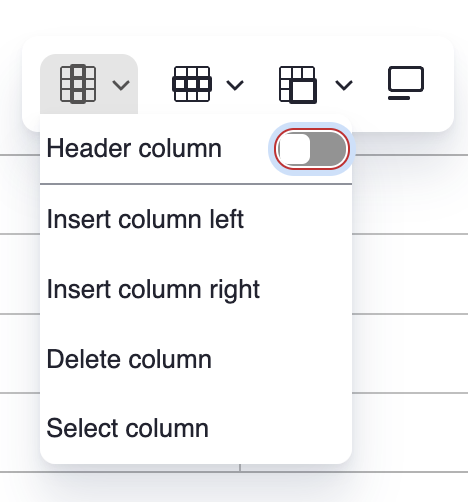
Once you have added your table, click on it to either add text or choose more options. You can:
- Add a header row or column
- Add additional rows or columns
- Merge or split cells
- Toggle a caption off or on
Adding an Image
Click on the Media icon and then choose the 'Image' tab.

Use the 'choose file' button to choose an image from your computer to upload it to the site. Add alternative text and then click the 'save and insert' button.
If you would like to use an existing image in your site, scroll down and choose an image. Click the 'insert selected' button.
Once the image is in your WYSIWYG content area, click on the image to open up an image options toolbar. Here, you will have options to add a caption, link the image, edit alt text, add a text break, left/center/right align the image, or wrap text around the image.

Adding a Video
Click on the Media icon and then choose the 'Video' tab.
To add a new video, enter the browser URL for a YouTube video and click the 'add' button. Click the 'insert selected' button.
If you would like to use an existing video in your site, scroll down and choose a video. Click the 'insert selected' button.
Adding an iFrame
Clicking on the iframe button opens a window within a WYSIWYG and allows you to paste in code to embed an iframe. Once you have pasted the code, click the green checkmark and save the page.

Using the WYSIWYG to Create Links in your Website
Linking Text
To create a link in your WYSIWYG, highlight the text you would like to link and click the link tool which will open a pop-up window with link options.
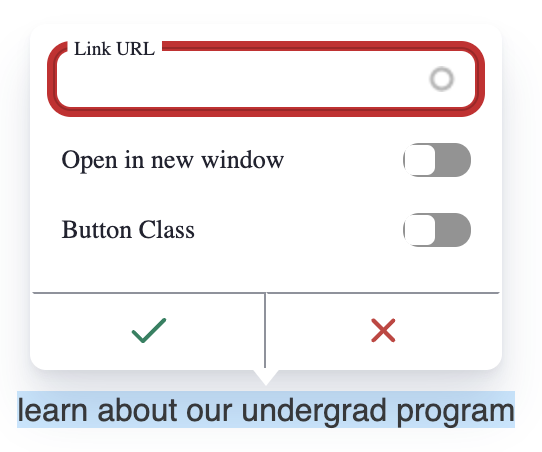
You can manually type in the desired URL, copy/paste a URL from your browser, or start typing the title of content in your site so it will auto-populate the link. If you would like the link to be a button, you can choose the 'button class' toggle. If you are linking to a file (like a pdf or a file in Box) or if the link is interrupting a process (for example, filling out a web form), you can choose the 'open in new window' toggle. You should NOT be opening external or non-WashU websites in a new tab or window.
Relative Links:
To create a link to content inside of your website, highlight some text, click the link tool, and type or paste in everything after the ".edu" in the web address. For example, if you are on your Home page and want to link to your Events landing page, you would use /events for your link.
Absolute Links:
To create a link to content outside of your website, highlight some text, click the link tool, and type or copy/paste the entire URL into the 'link URL' field.
External Links:
To create a link going to a destination outside of your website, highlight some text and then click the link tool to type or paste in the entire link address. For example, if you want to create a link to the Ampersand page on the main Artsci website, you would use https://artsci.wustl.edu/ampersand. Select the 'open in a new window' option only if you are linking to a file (pdf, link to file in Box, etc.), or when the link is interrupting a process, such as filling out a web form. If you are linking to an external or non-WashU website, you should NOT check the 'open in new window' checkbox.
Making links accessible
- Avoid using vague link text, such as "click here"
- Whenever possible, include the name of the thing you are linking to. For example, instead of 'Read More', use 'read more about student policies'.
- Select the 'open in a new window' option only if you are linking to a file (pdf, link to file in Box, etc.), or when the link is interrupting a process, such as filling out a web form. If you are linking to an external or non-WashU website, you should NOT check the 'open in new window' checkbox.
Making your links accessible is helpful to users of screen reader technology because links on a page can be read off as a list of link options. Also, it improves the experience for all visitors if you tell them what to expect before they use a link.
Creating a Linked Button
To create a linked button in your WYSIWYG, highlight the text you would like to link and click the link tool which will open a pop-up window with link options. Enter the URL you want to link to.
If you linking to a file (like a pdf or a file in Box) or if the link is interrupting a process (for example, filling out a form), you can choose the 'open in new window' toggle. To turn the link into a button, you can choose the 'button class' toggle. If you choose to open the link in a new window, an external link arrow will automatically be added to your button. Click the green checkmark to save. If you would like to edit the URL, click on the button click on the button and it will open up editing options.
Anchor Links within Text

Using an Anchor Link allows you to link to a specific spot created in a WYSIWYG located within the same page.
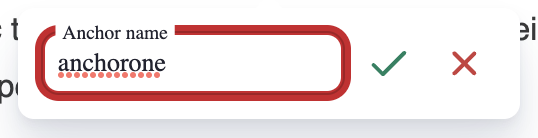
Create an Anchor
1. Put your cursor in front of the text that you want to link to
2. Click on the anchor link tool and a window will open asking you to give the anchor a name. Don't use any spaces or special characters in the name.
3. After naming and saving the anchor, you will see an 'invisible anchor' link. This link will only display while editing and will not be visible to site visitors.
Link to the Anchor
1. Highlight the text you would like to use and then click the link tool.
2. In the window that opens, type in a hashtag followed by the name you chose for your anchor into the 'link url' field and then save.
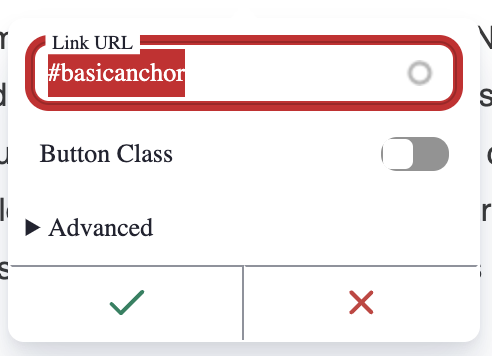
3. Save the page.
Custom Anchor Links in the Anchor Link Bar
Multipurpose pages have an extra custom anchor link field in the anchor link section. Using this custom anchor link field allows you to link to a specific spot created in a WYSIWYG located within the same page.
Create a Custom Anchor on a Multipurpose Page:
1. Put your cursor in front of the text that you want to link to
2. Click on the anchor link tool and a window will open asking you to give the anchor a name. Don't use any spaces or special characters in the name.
3. After naming and saving the anchor, you will see an 'invisible anchor' link. This link will only display while editing and will not be visible to site visitors.
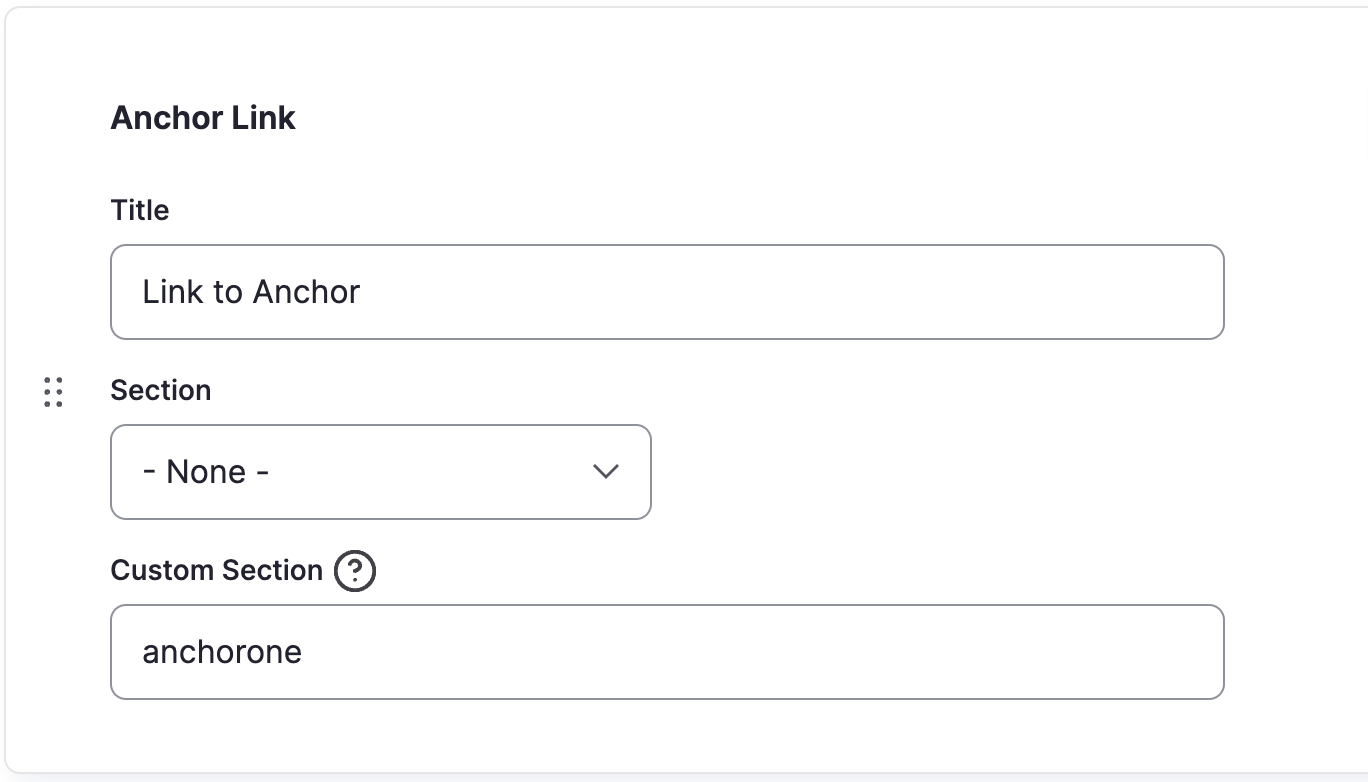
Link to the Custom Anchor
1. Go to the anchor link bar in your Multipurpose page and create a new anchor link.
2. In the Custom Section field, enter the name that you used to name the anchor in the previous step. The Section dropdown should remain as 'none'.
3. Save the page
Linking to Documents in Box
Why use Box to link your documents?
When you link to a document stored in Box, you can update that document by uploading a new version with the same name. If you don't change the document name, it will create version 2 (v3, v4, v5, etc) in Box and that link from your website will not break. If you upload a new version with a different name, you'll need to make a new link and edit the website - so we recommend using a document name that doesn't include a date or semester. In other words "Student Handbook" rather than "Fa2019 Handbook."
How to create a link to your Box document
- Upload your document to the folder you use for website documents in Box.
-
After choosing and opening your document in Box, click the red 'share' button
-
In the new window that opens, confirm that the 'people with the link' option has been chosen.
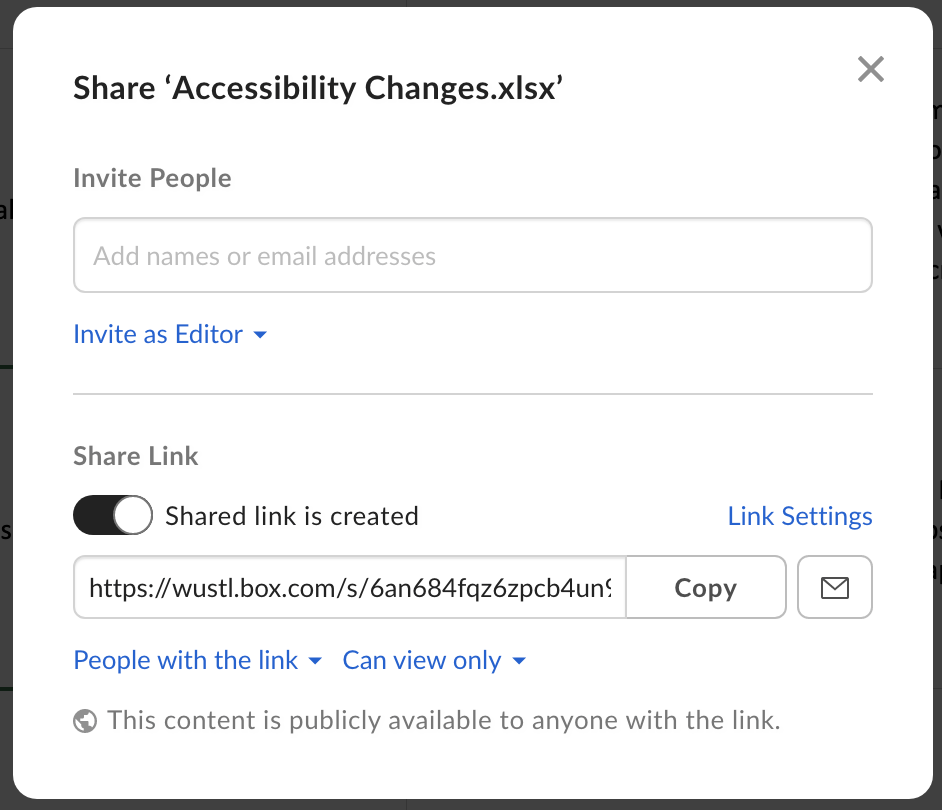
4. If you want your link to always be available, click 'link settings' to turn off the expiration date.
5. Copy the link.
6. Go to your web page and highlight the text that you wish to use as link text. Do not use general words such as "click here," instead describe what the visitor is going to get if they follow the link. For instance "Download a copy of the form." With the text highlighted, click on the link tool in your toolbar and paste in the link you copied. Select the 'open in a new window' option only if you are linking to a file (pdf, link to file in Box, etc.).
Linking to a Filtered View
What is a filtered view?
If you click on one of the checkboxes at the top of your "Our People" page or click on a taxonomy term on other landing pages, you will be looking at a filtered view. Sometimes as you write content for a particular audience, you may find that you want to link to a filtered view of people, events, or articles.
To get a filtered view link, choose your taxonomy terms and then copy the URL . You can now use this URL to link to your filtered view.
Linking to an External Website
To create a link going to a destination outside of your website, highlight some text and then click the link tool to type or paste in the entire link address. For example, if you want to create a link to the Ampersand page on the main Artsci website, you would use https://artsci.wustl.edu/ampersand. Select the 'open in a new window' option only if you are linking to a file (pdf, link to file in Box, etc.), or when the link is interrupting a process, such as filling out a web form. If you are linking to an external or non-WashU website, you should NOT check the 'open in new window' checkbox.
Linking to Unpublished Content
Sometimes you might need to get approval for a new page before you publish it. Here's how to do it:
1. To unpublish a piece of content, change the current state of the content to 'unpublished' in the right-hand sidebar while editing.
2. After saving the page, you should see two banners at the top of the page.

3. Click the underlined words "hashed link" in the second banner and the URL of the page will change to something very long and complicated.
4. Copy that long URL and share it with the approver. They will be able to view the unpublished page without logging in.
For more information about the different publishing and content moderation options, please visit the Page Setting sections of our web guide.
If you need to go back and get a hashed link for an unpublished page at a later date, instead of resaving the page to trigger the hashed link' in the blue banner to reappear, you can just go edit the page and go to the editing options and click on the Unpublished Hashed Link tab.

This will allow you to copy the hashed link URL, set an expiration date for the hashed link, or delete a hashed link.

Linking to a Course in Course Listings or the Bulletin
Linking to a Course in the Bulletin:
- Go to the bulletin
- Search for the course title
- Follow the link over to the course listings page and copy the URL
- Paste it into your web page
Manually create a link to a specific course in WUCRSL:
This is a link to the Modern & Contemporary Chinese Art Course: https://courses.wustl.edu/CourseInfo.aspx?sch=L&dept=L01&crs=3426
Notice that it uses the department number (L01) and the course number (crs=3426) in the URL. If you change those two numbers, you can use this address as a pattern to link to any other course.
Additional Examples of the Pattern:
https://courses.wustl.edu/CourseInfo.aspx?sch=L&dept=L14&crs=160
https://courses.wustl.edu/CourseInfo.aspx?sch=L&dept=L46&crs=313