Making a Basic Webform
Security Note:
None of the data submitted through webforms is encrypted, so webforms should never be used to collect sensitive information. If your site is public, the files uploaded through a webform are also technically public. (If someone knows the URL, they can access the files).
Where are my Existing Webforms?
Webforms can be found by clicking on the Webform tab in the admin menu:

This will take you directly to the Webform overview page which allows you to see all of the webforms in your site. This page will let you view and manage your forms, see webform submissions, and even add a new form.

Creating a new Webform
1. Go to the Webforms tab in your admin toolbar and then choose the Add a Webform option.

2. Give your webform a title and choose open or closed for the webform's status. It is best to have your webform closed until it is completed and you are actively wanting submissions. You can also add a description of your webform. The description is just for your reference and will not display on the actual form.
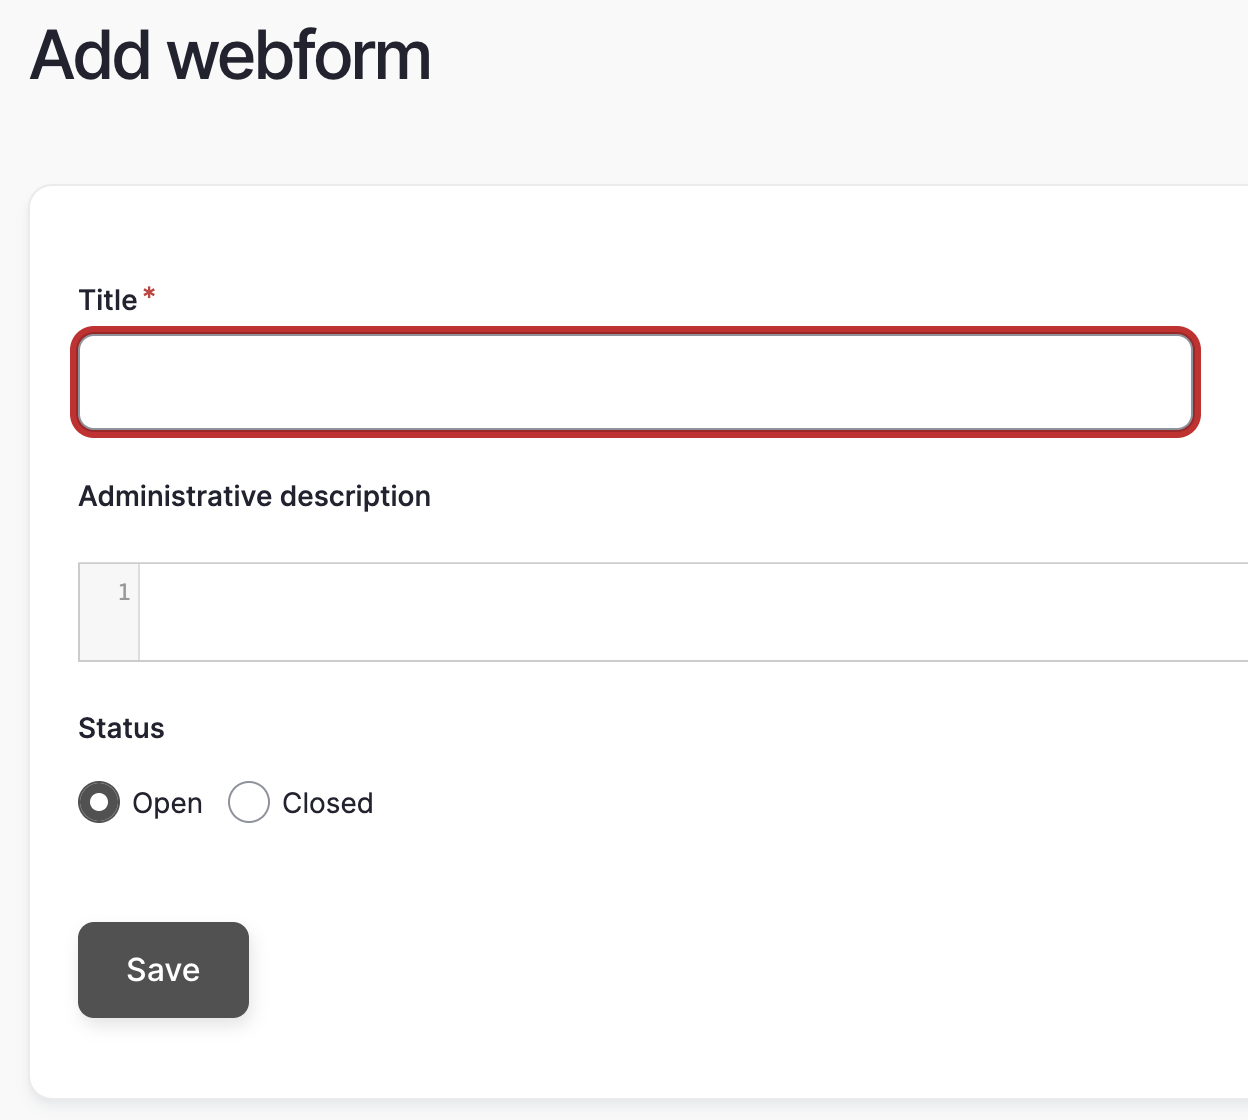
3. Click save.
4. Now you are ready to add the elements!
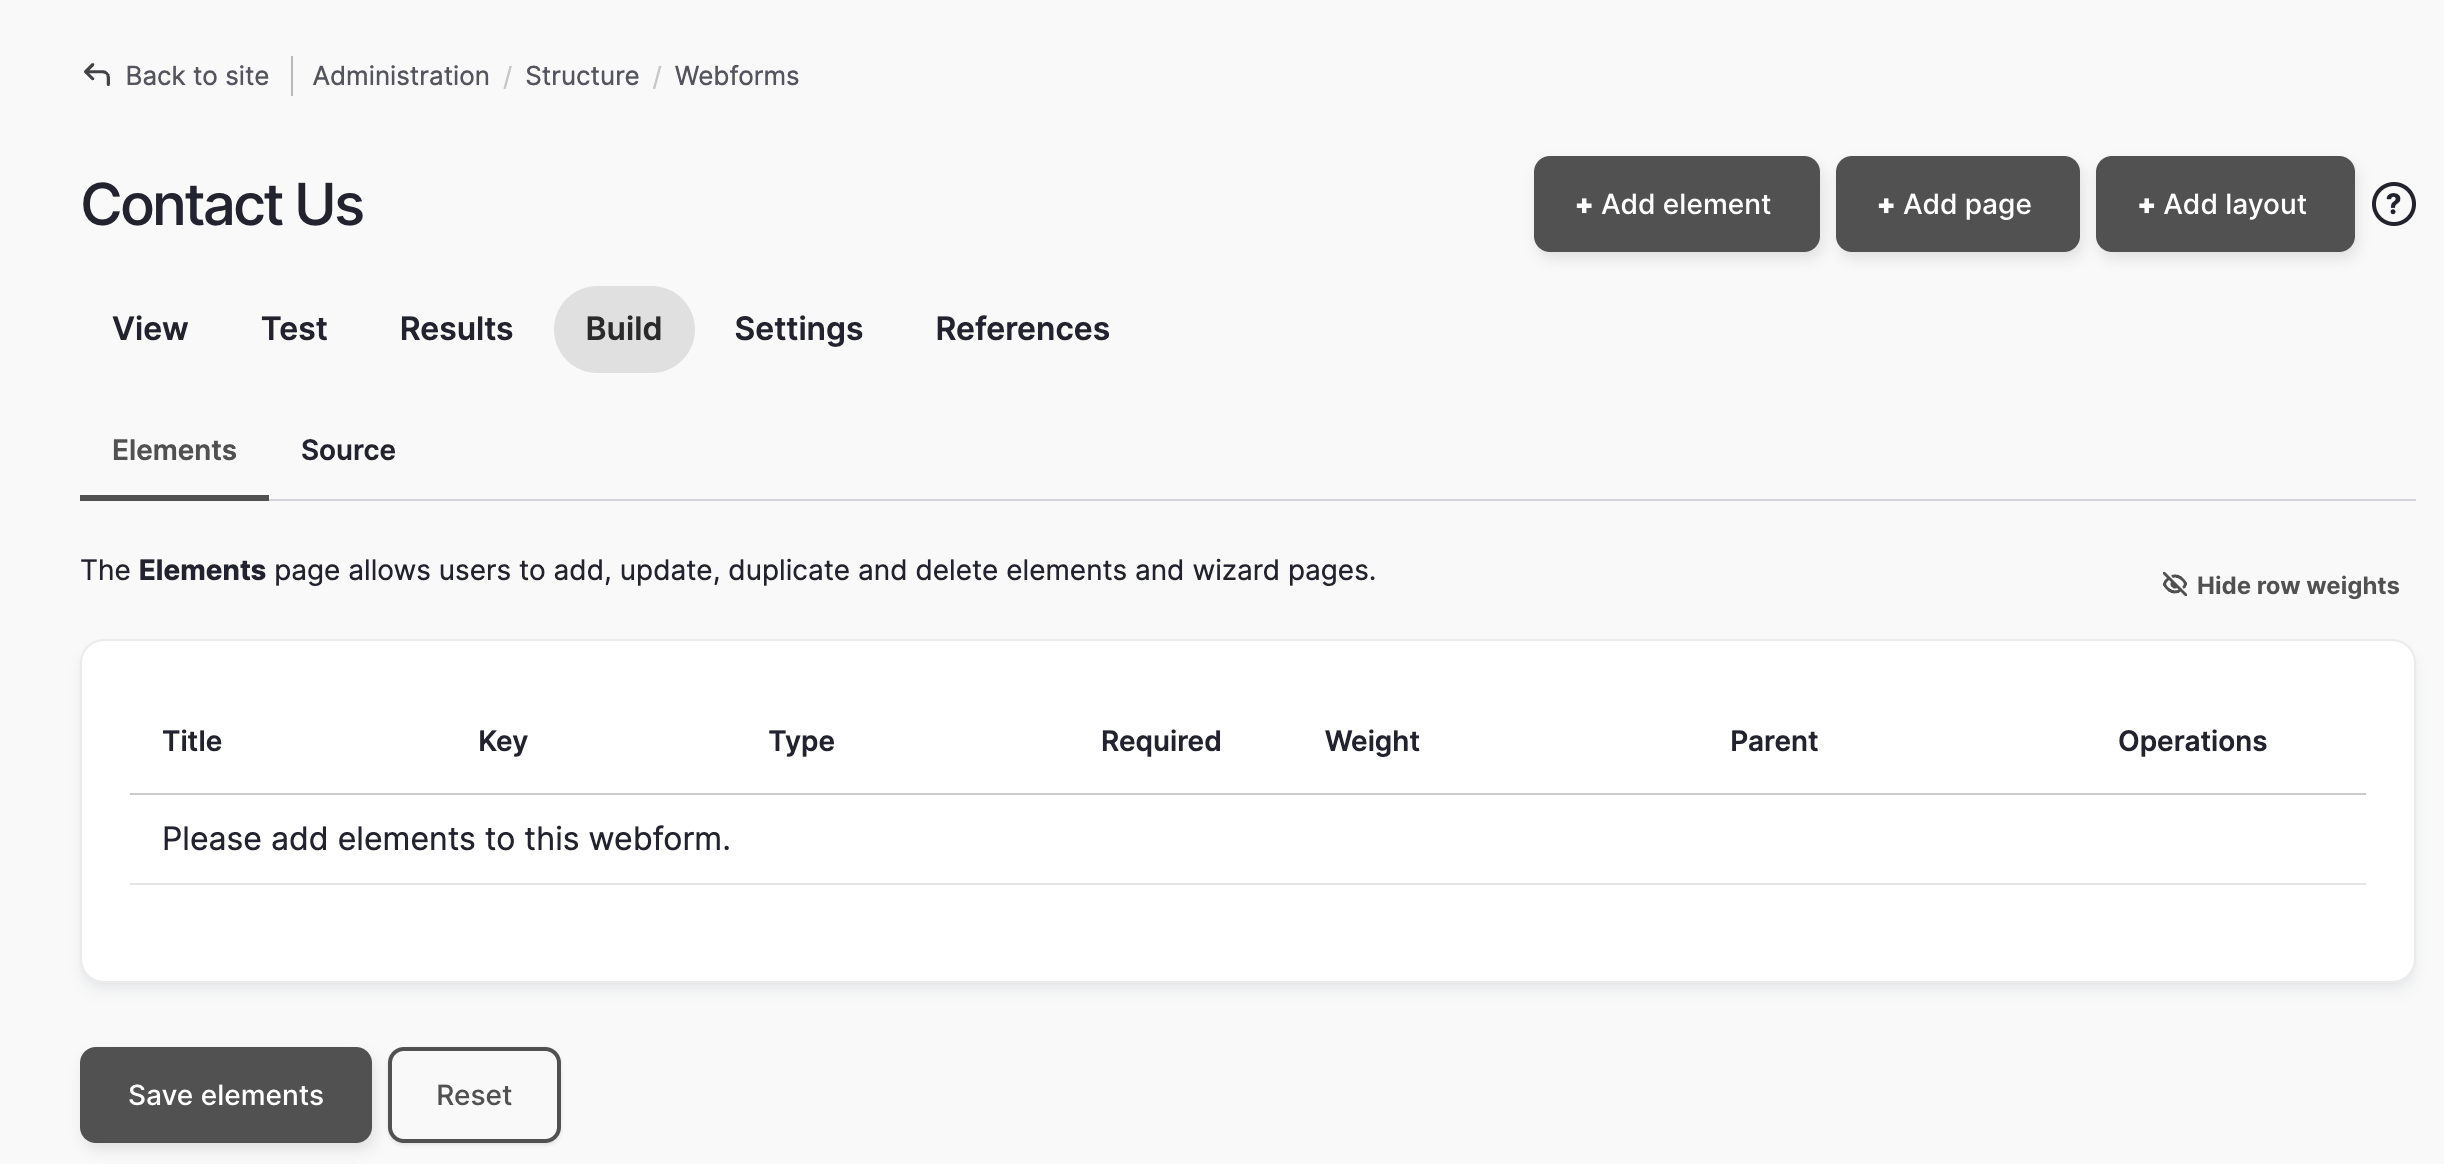
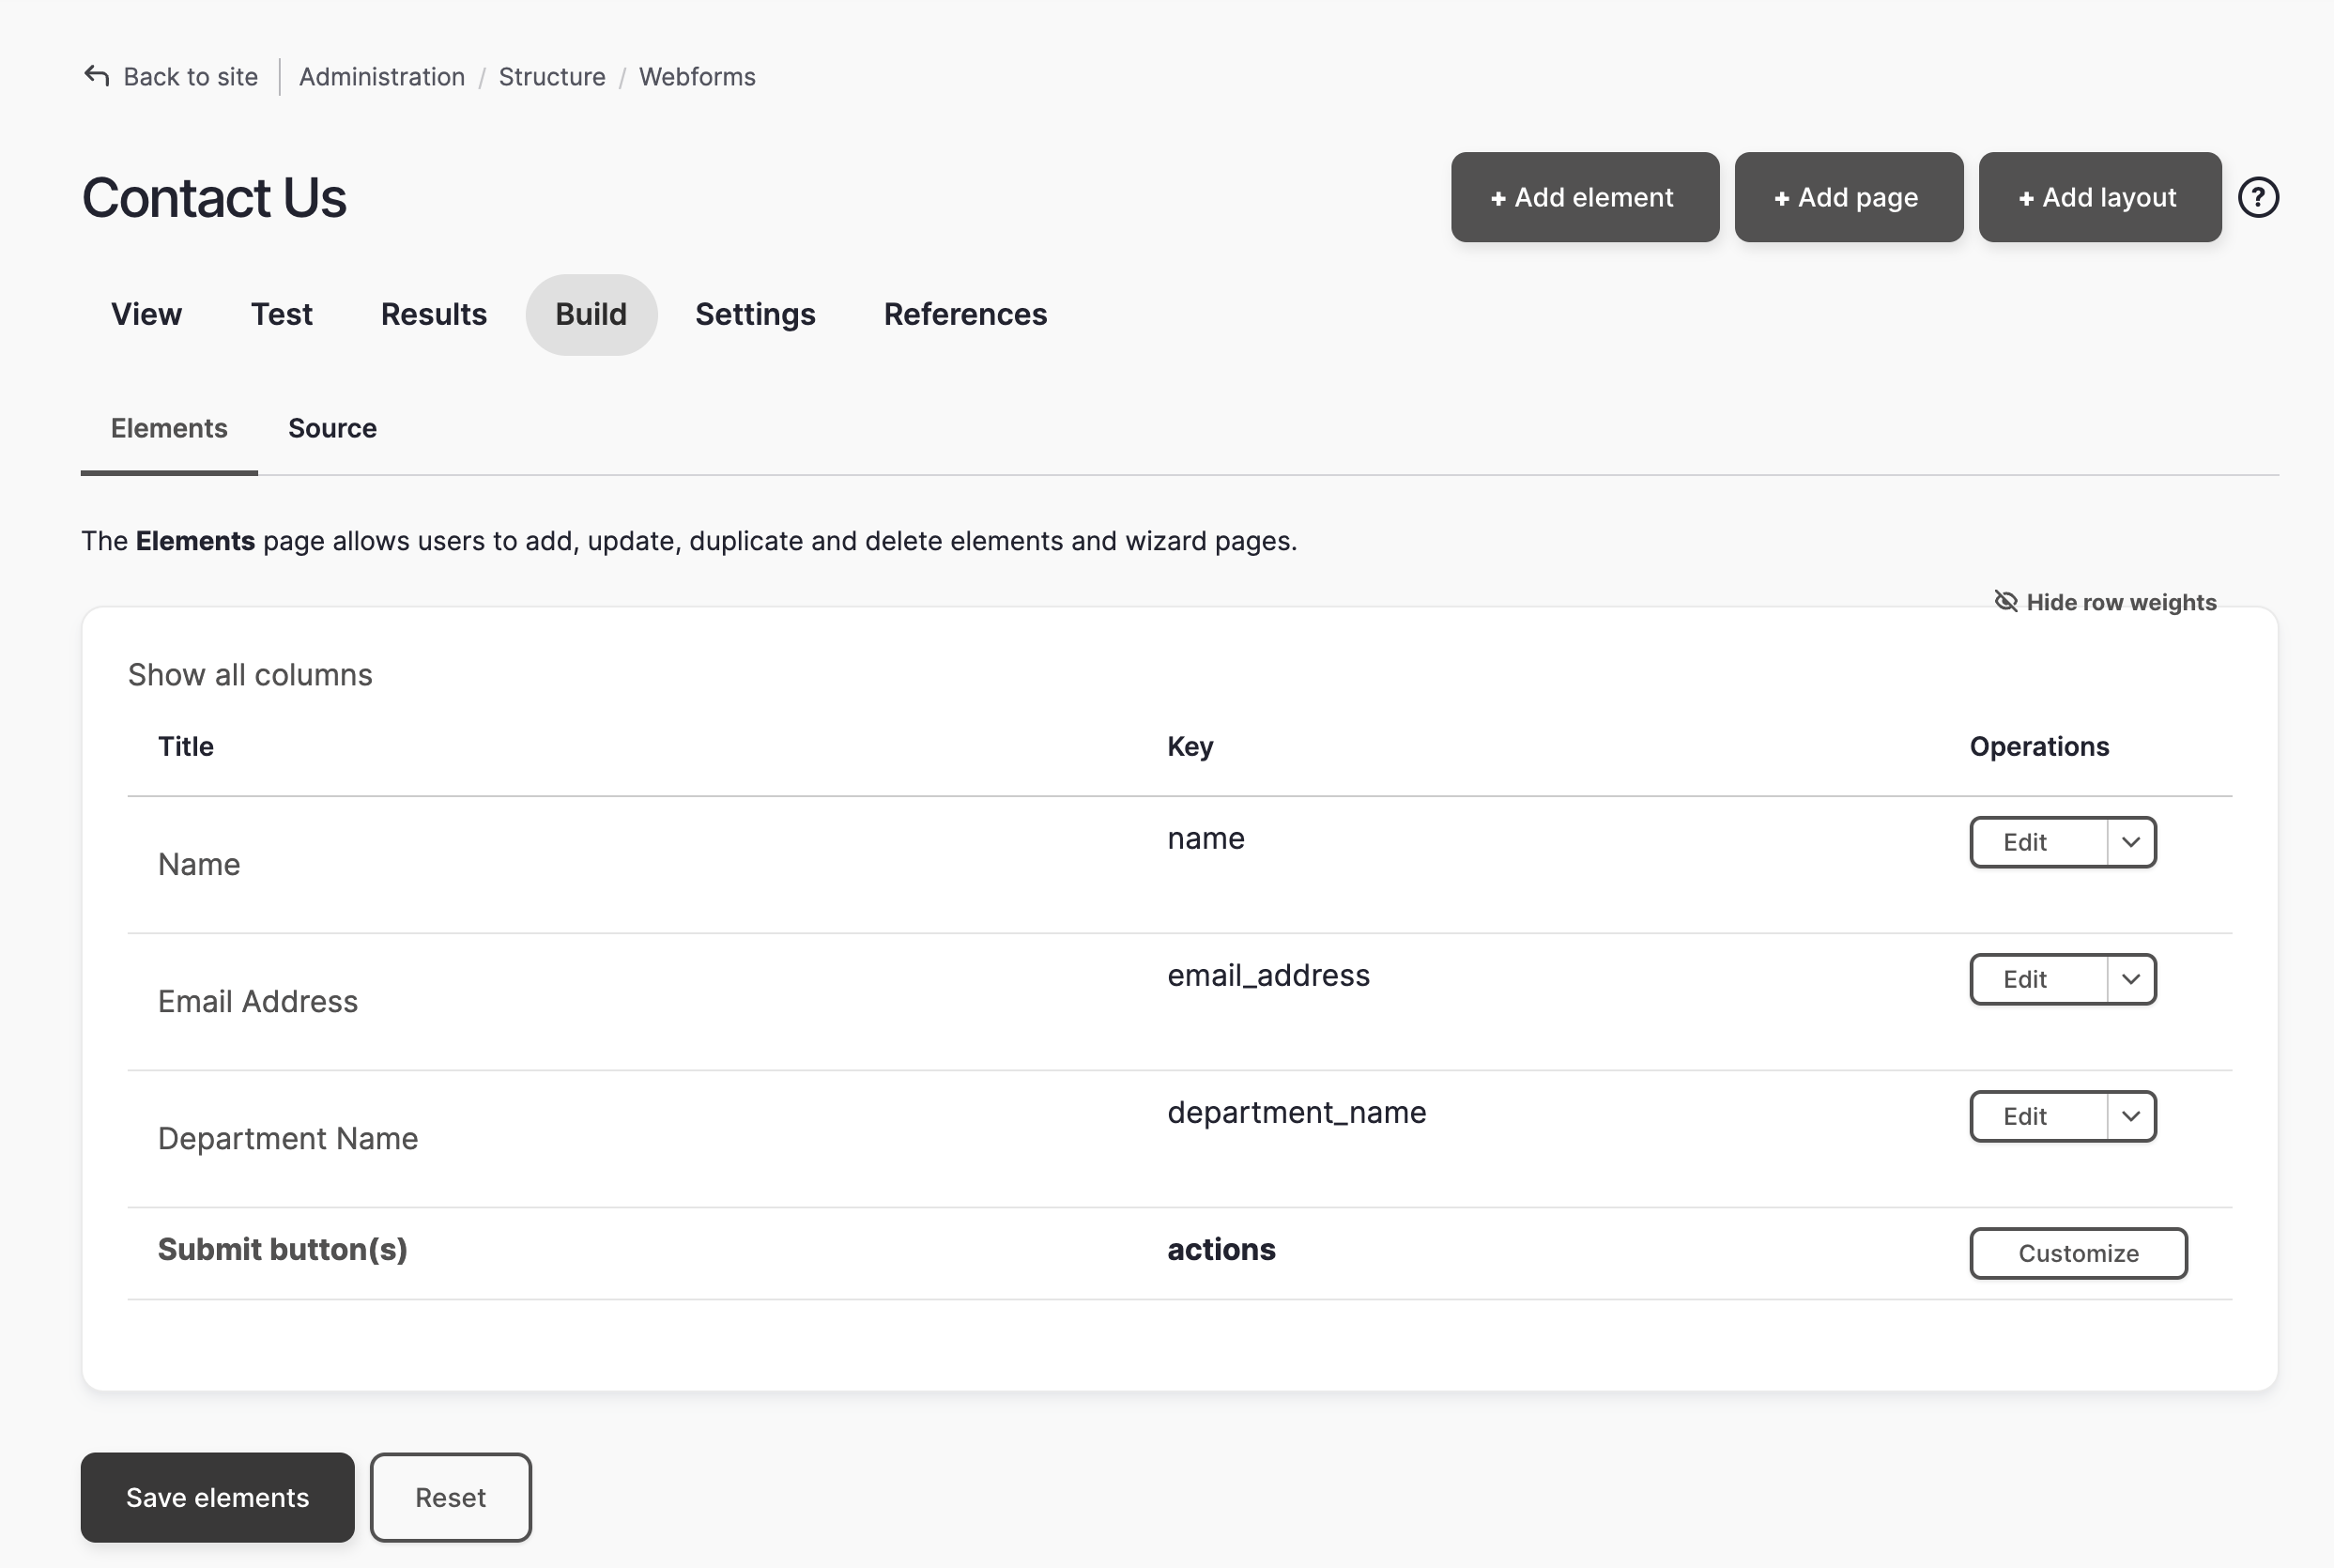
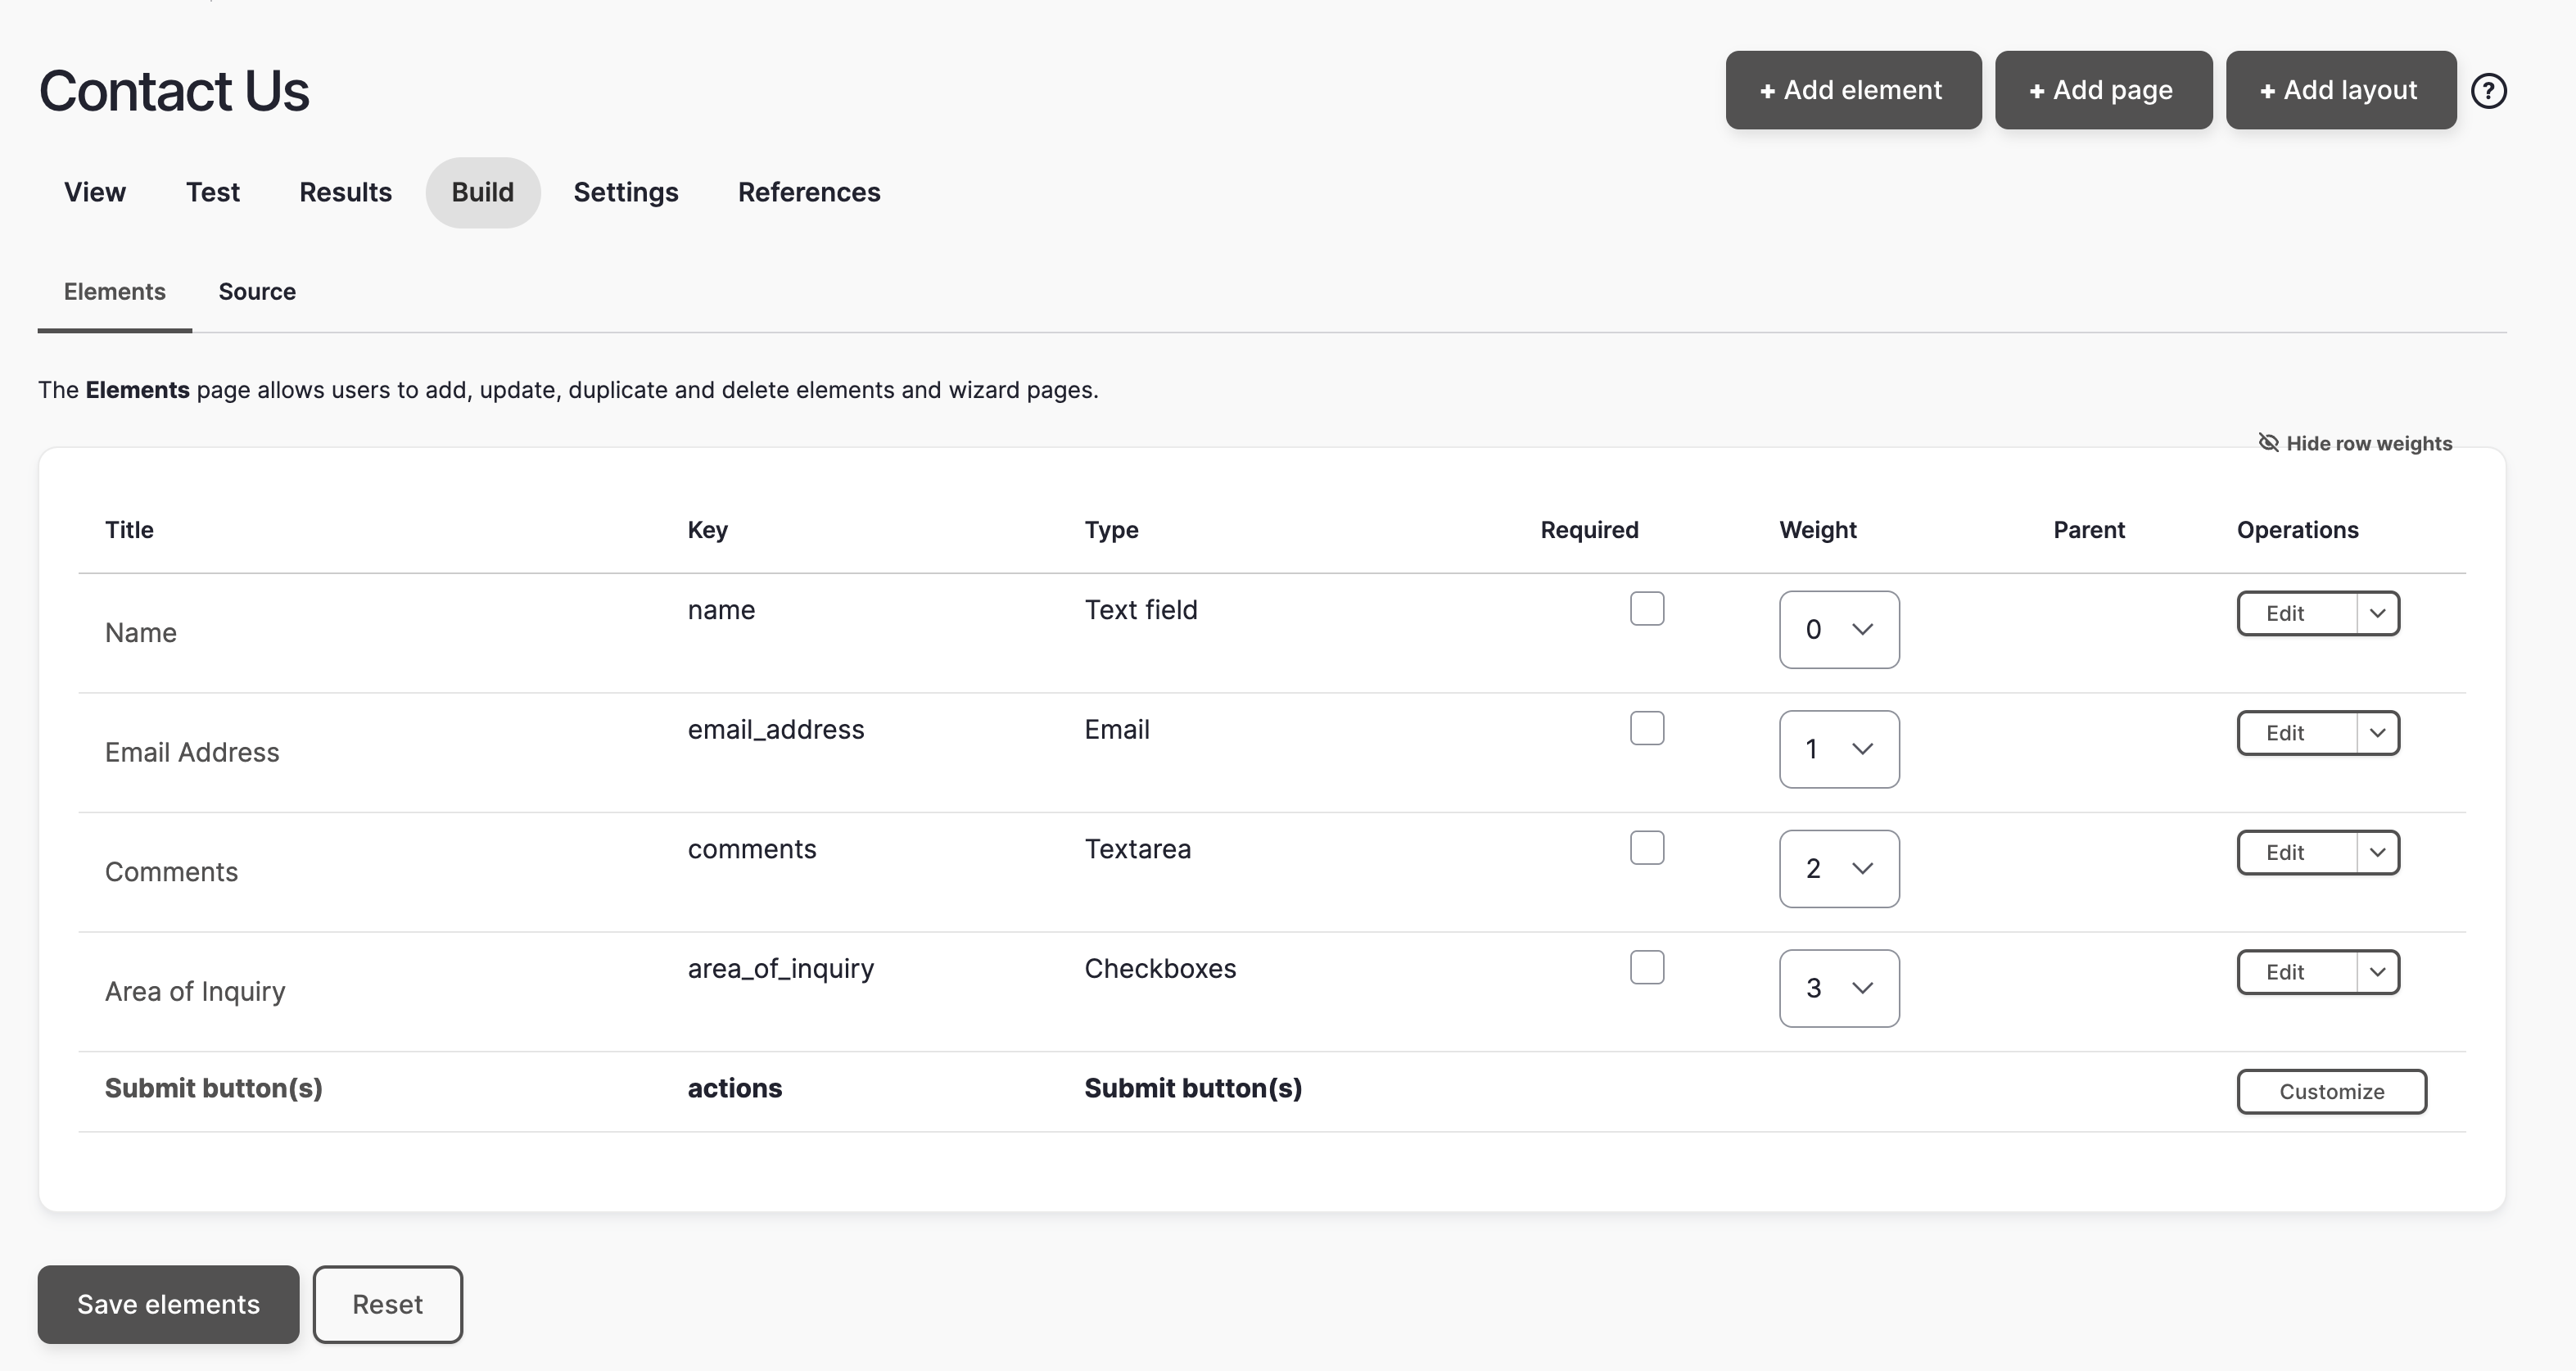
Adding Elements to your Webform
When you are ready to start building your webform, make sure you are on the 'build' screen. Click the +add element button.
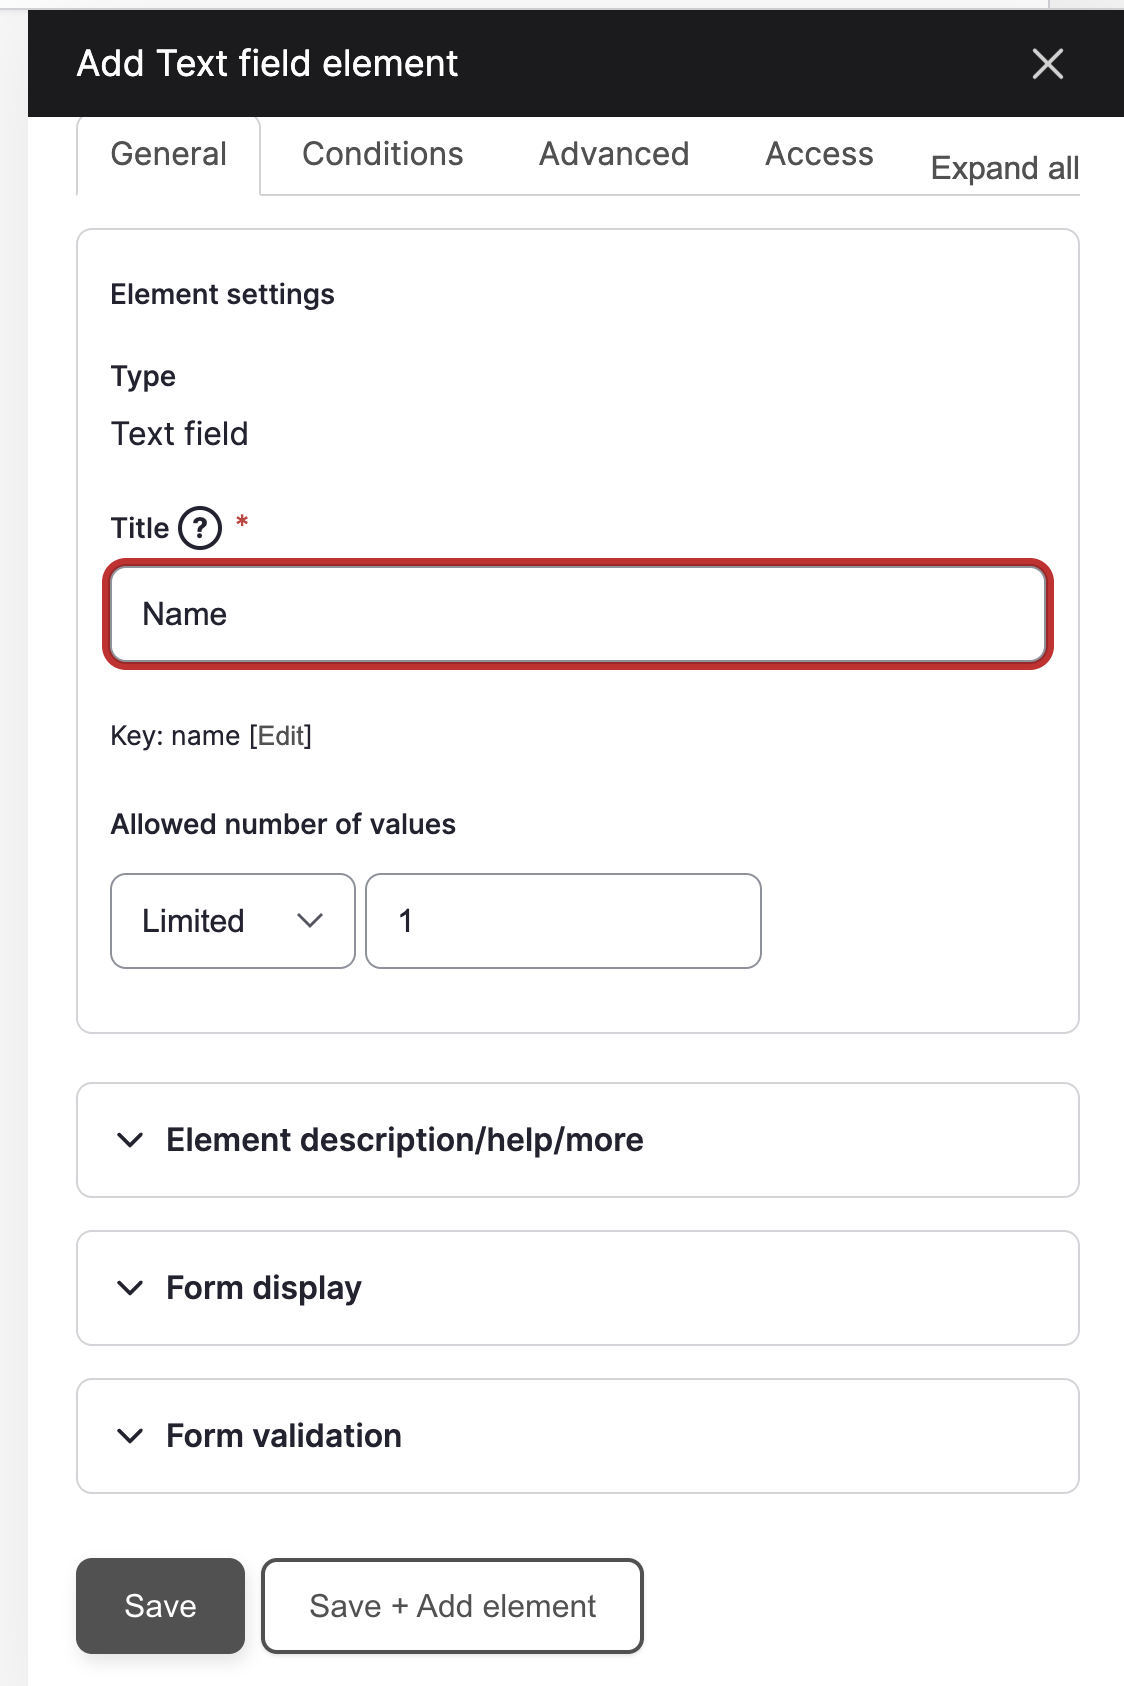
Once you have chosen an element, click 'add element' button next to it.
Give your element a name and then click the 'save' button. You must save your element with a name before you can make any edits to your element.
Once you have added all of your elements, click the 'save elements' button at the bottom.
What kind of Elements can I add to my Webform?
To browse the available elements, make sure you are on the 'build' screen of your webform and then click the +add element button. Elements are divided into seven different sections. You can open and close the dropdown accordions to see what elements are available and their description. If you would like to see what an element looks like, click the 'show preview' button at the top.
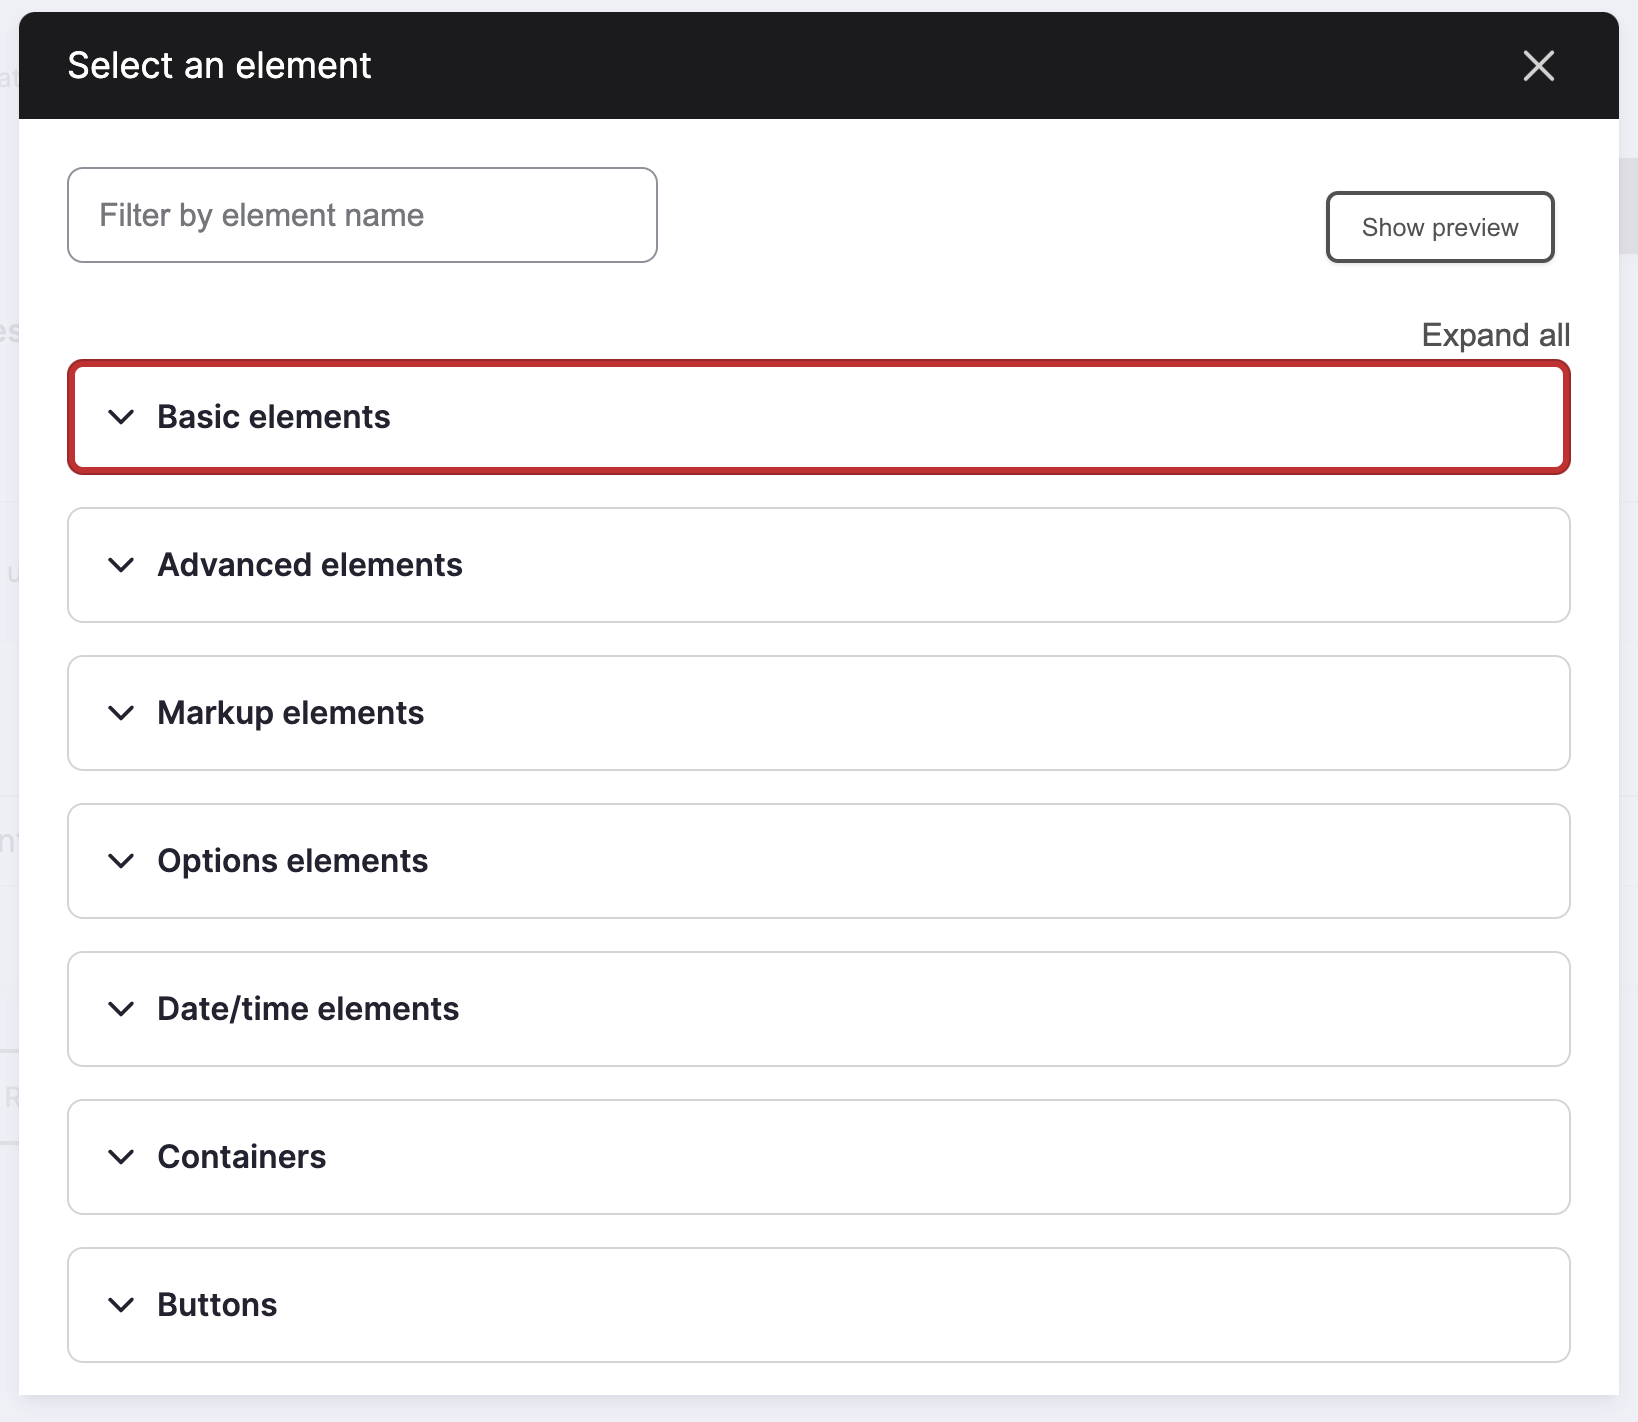
Basic Elements:
Checkbox: This provides a single checkbox
Hidden: This provides a hidden input element
Text Area: This is a text box for multiple lines of text, such as an area for comments.
Text Field: This is a text box for a single line of text, such as a name field.
Advanced Elements:
Email: This is a field where you can only enter an email address
Number: This field only allows numbers
Signature: This is an element to collect electronic signatures from users
Telephone: This is an element that only allows a phone number. It also has a dropdown for country codes.
Terms of Service: A check box with 'I agree to the terms of service' text.
Text Format: This is an element for the user with a WYSIWYG editing tool in it.
Markup Elements:
Advanced HTML/Text: This is an element that allows you to add formatted text. This is what you should use if you would like to add a title or instructions for your user.
Basic HTML: An element that allows you to add non-formated basic text
Horizontal Rule: A horizontal dividing line
Label: This adds text that is formatted like a label but has no element associated with it.
Message: This is a custom dismissible status message to alert the user filling out the form
More: A slideout element that the user clicks to get more information
Options Elements:
Checkboxes: A set of basic checkboxes
Checkboxes other: A set of checkboxes with the ability to add an 'other' or custom value.
Radios: A set of basic radio buttons.
Radios other: A set of radio buttons with the ability to add an 'other' or custom value.
Select: Provides a drop-down menu or a scrolling selection box.
Select other: Provides a drop-down menu or a scrolling selection box with the ability to enter a custom value.
Table Select: A form element with radios or checkboxes in a table column.
Date/Time Elements:
Date: Adds an element to enter a date
Date/Time: Adds an element for a date and time
Date List: Adds date and time with dropdown options
Time: Adds an element to enter a time
Containers:
Fieldset: A fieldset is a box that groups together related fields
Flexbox Layout:
Buttons:
Submit button: Add a submit button to your form
Additional Webform Features
Changing the order of your Elements
To change the order of the elements in your form, you can drag and drop the elements by using the arrows to the left of the element title:

You can also adjust the order of the elements using the weight number in the weight column by clicking on the 'show row weights' button above the Operations column. Lower numbers are at the top, higher numbers are at the bottom.
Adding intro text at the top of a form
To add text anywhere on your form, navigate to your form and click the +Add Element button. When prompted to select an element, go to the Markup Elements tab and open it.
There are two types of text elements that you can choose from:
- Advanced HTML/Text: This option has a WYSIWYG toolbar. This means you can add headings and format your text. If you are wanting something to allow you to add a title and directions for your webform, you would choose this option.
- Basic HTML: This will allow you to just enter basic unformatted text.
Controlling the Width of a Field
You can control the width of text, email, telephone, and button fields in your webforms.
1. Go to the webform overview page and choose which webform you would like to work on and click on the title to open it.
2. Make sure you are on the 'build' tab.
3. Click on the field title of the element you would like to change the width of.
4. When the 'edit element' box pops up, choose the 'advanced' tab at the top

6. Click on the 'submission display' option.
7. Click inside of the 'display CSS classes' field and choose the 'custom' option.
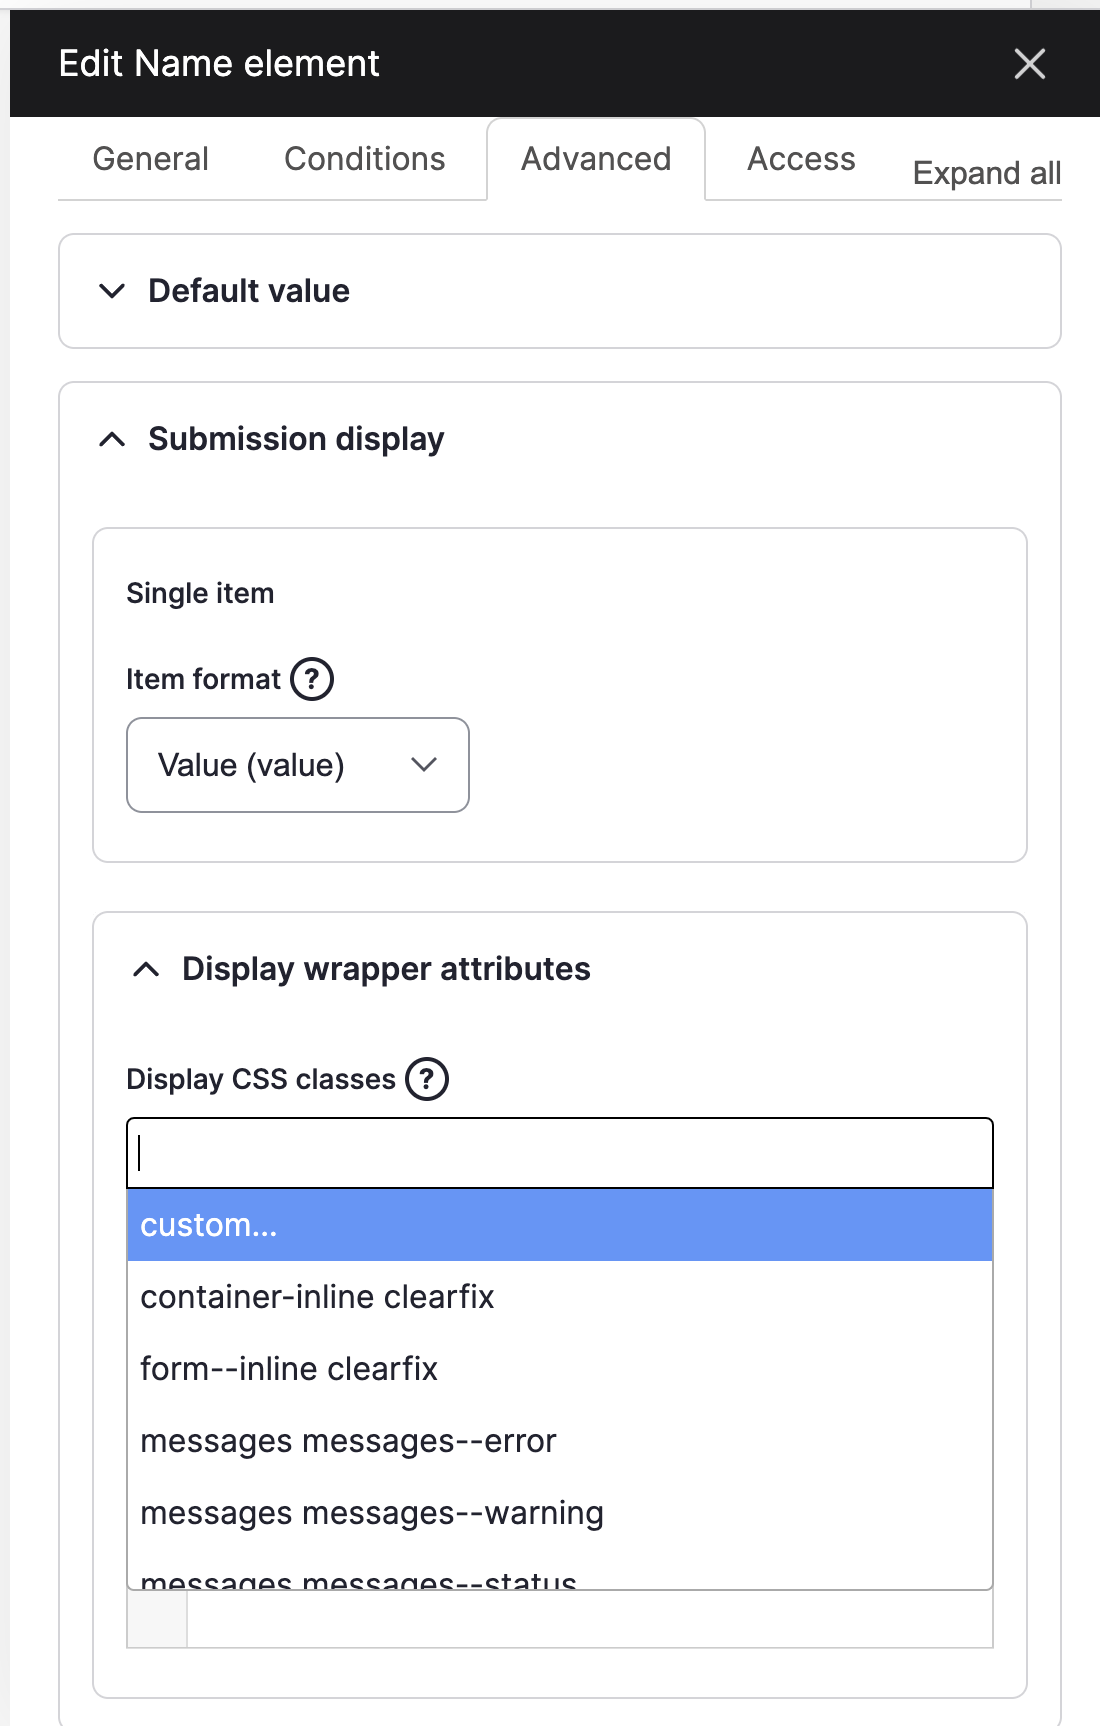
8. Enter one of the available CSS classes in the field that pops up after you choose 'custom':
- half
- second-half
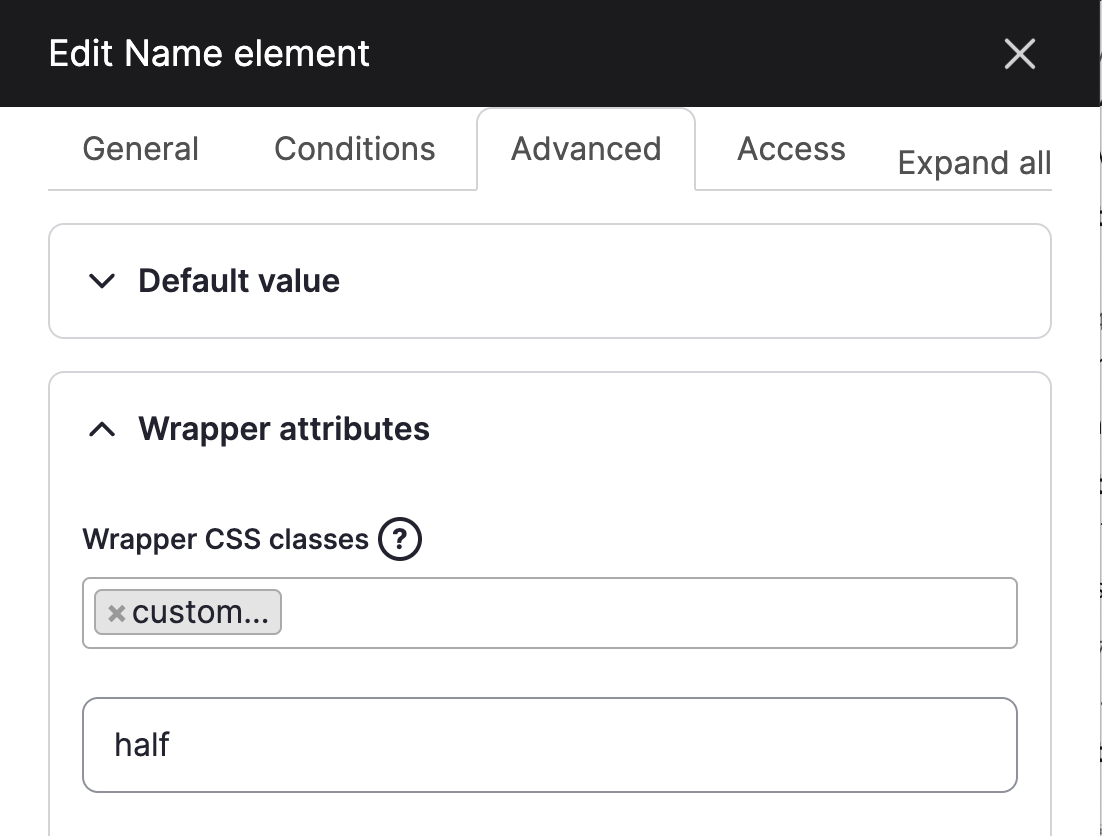
Remember, in order to get two fields on the same line, you need to change the CSS on multiple webform fields. For example, if you want a name field and an email address field to display next to each other, you have to change the CSS in the name field to 'half' in the name field and 'second-half' in the email address field.
9. Save the element.
Organizing your Webform
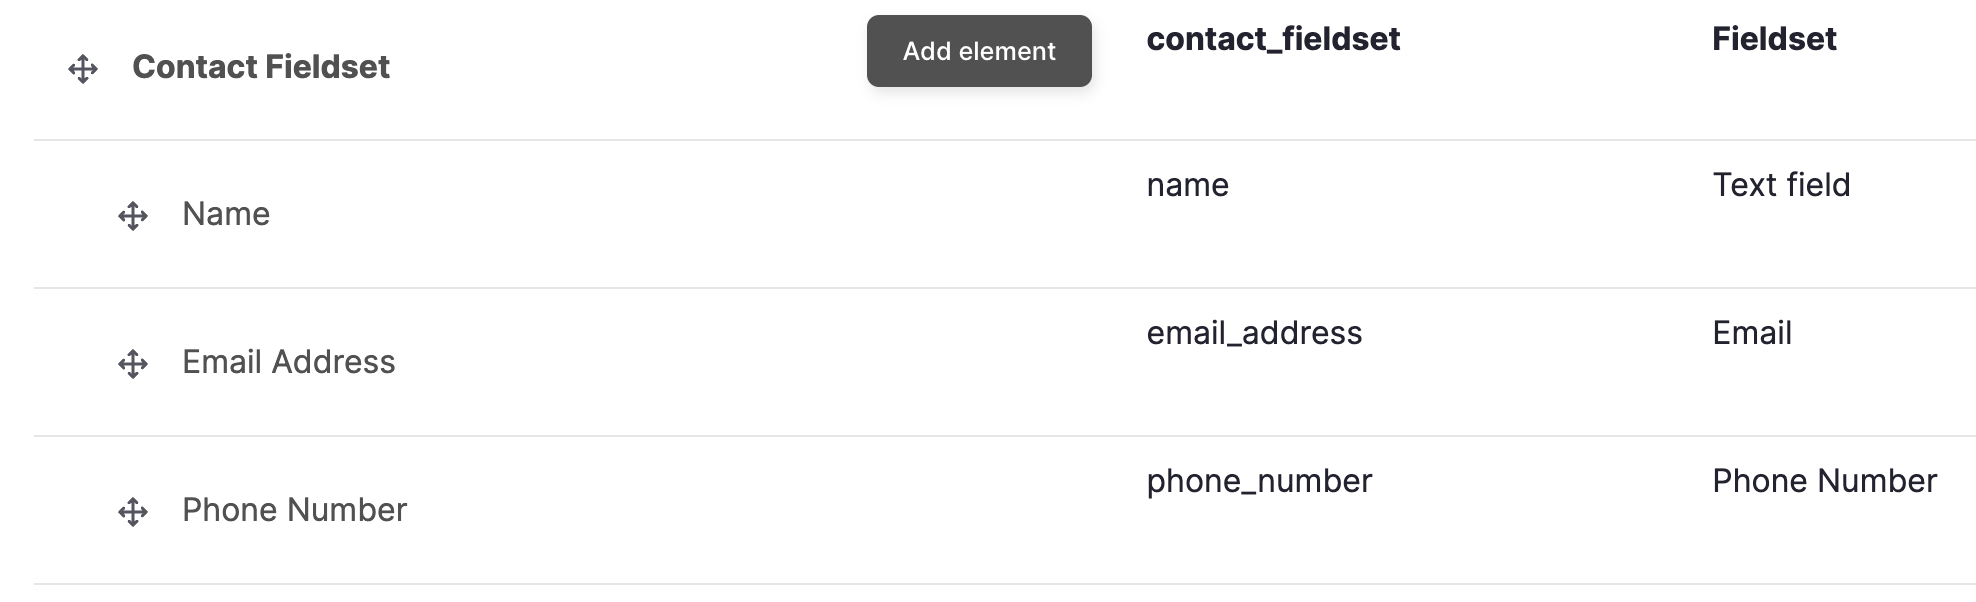
Fieldsets: Fieldsets group together related fields in a website by containing them in a thinly outlined box.
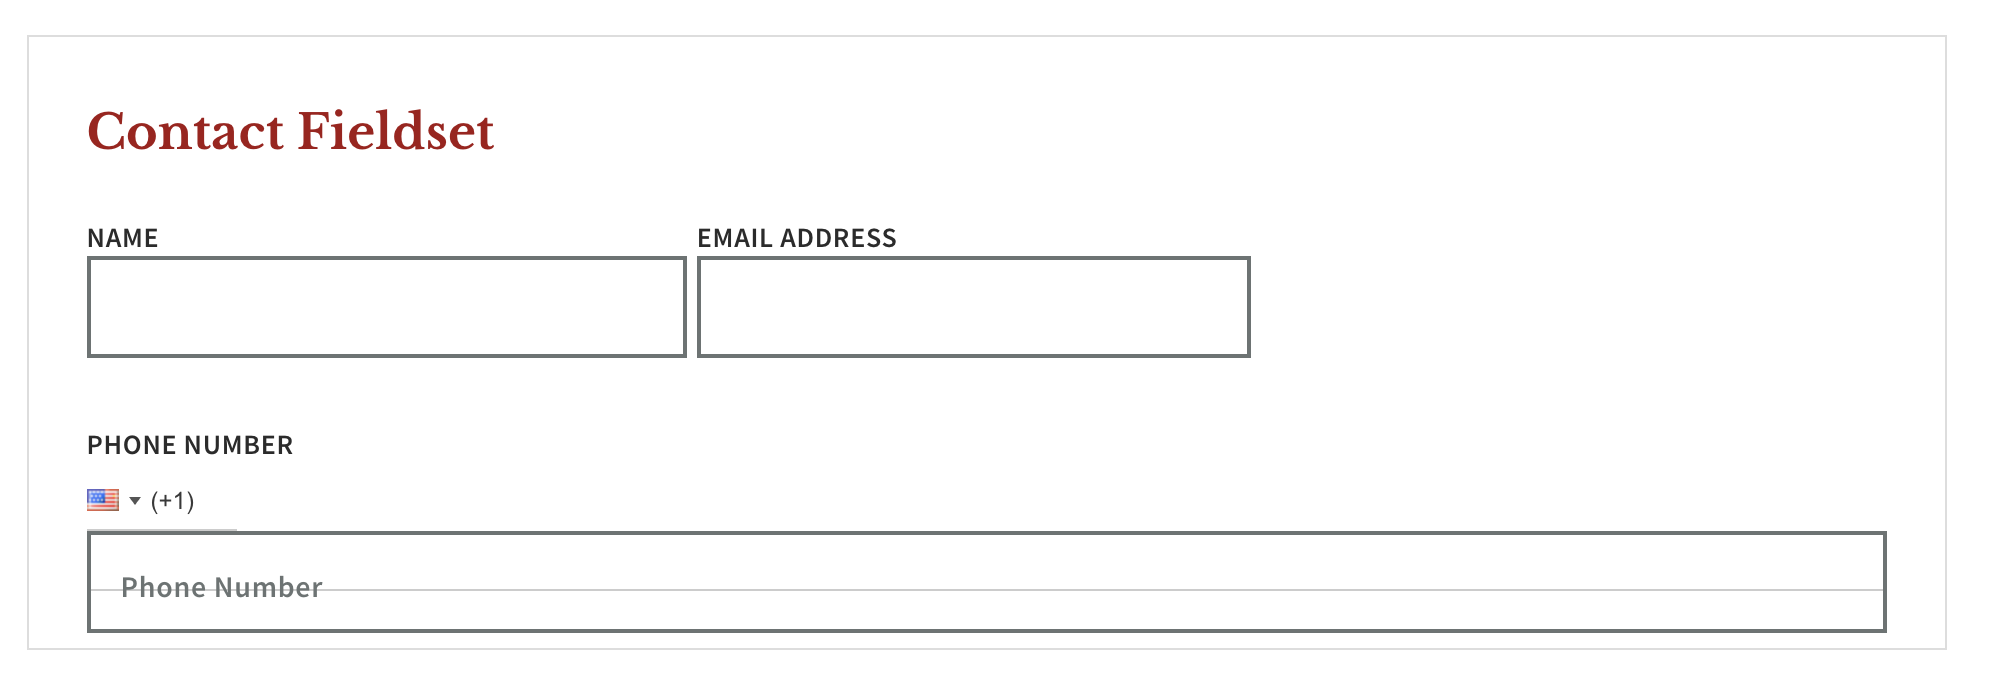
To add a Fieldset anywhere on your form, navigate to your form and click the +Add Element button. When prompted to select an element, go to the Containers tab and open it. The title you choose for your fieldset will also display on the front end and be the title of your grouped fields. To actually place fields within a fieldset, you will need to drag the desired fields under the fieldset element and pull them to the right to indent them:
Pagebreaks: Pagebreaks allow you to break up your forms into multiple pages. To add a Pagebreak anywhere on your form, navigate to your form and click the +Add Page button.
Conditional Fields
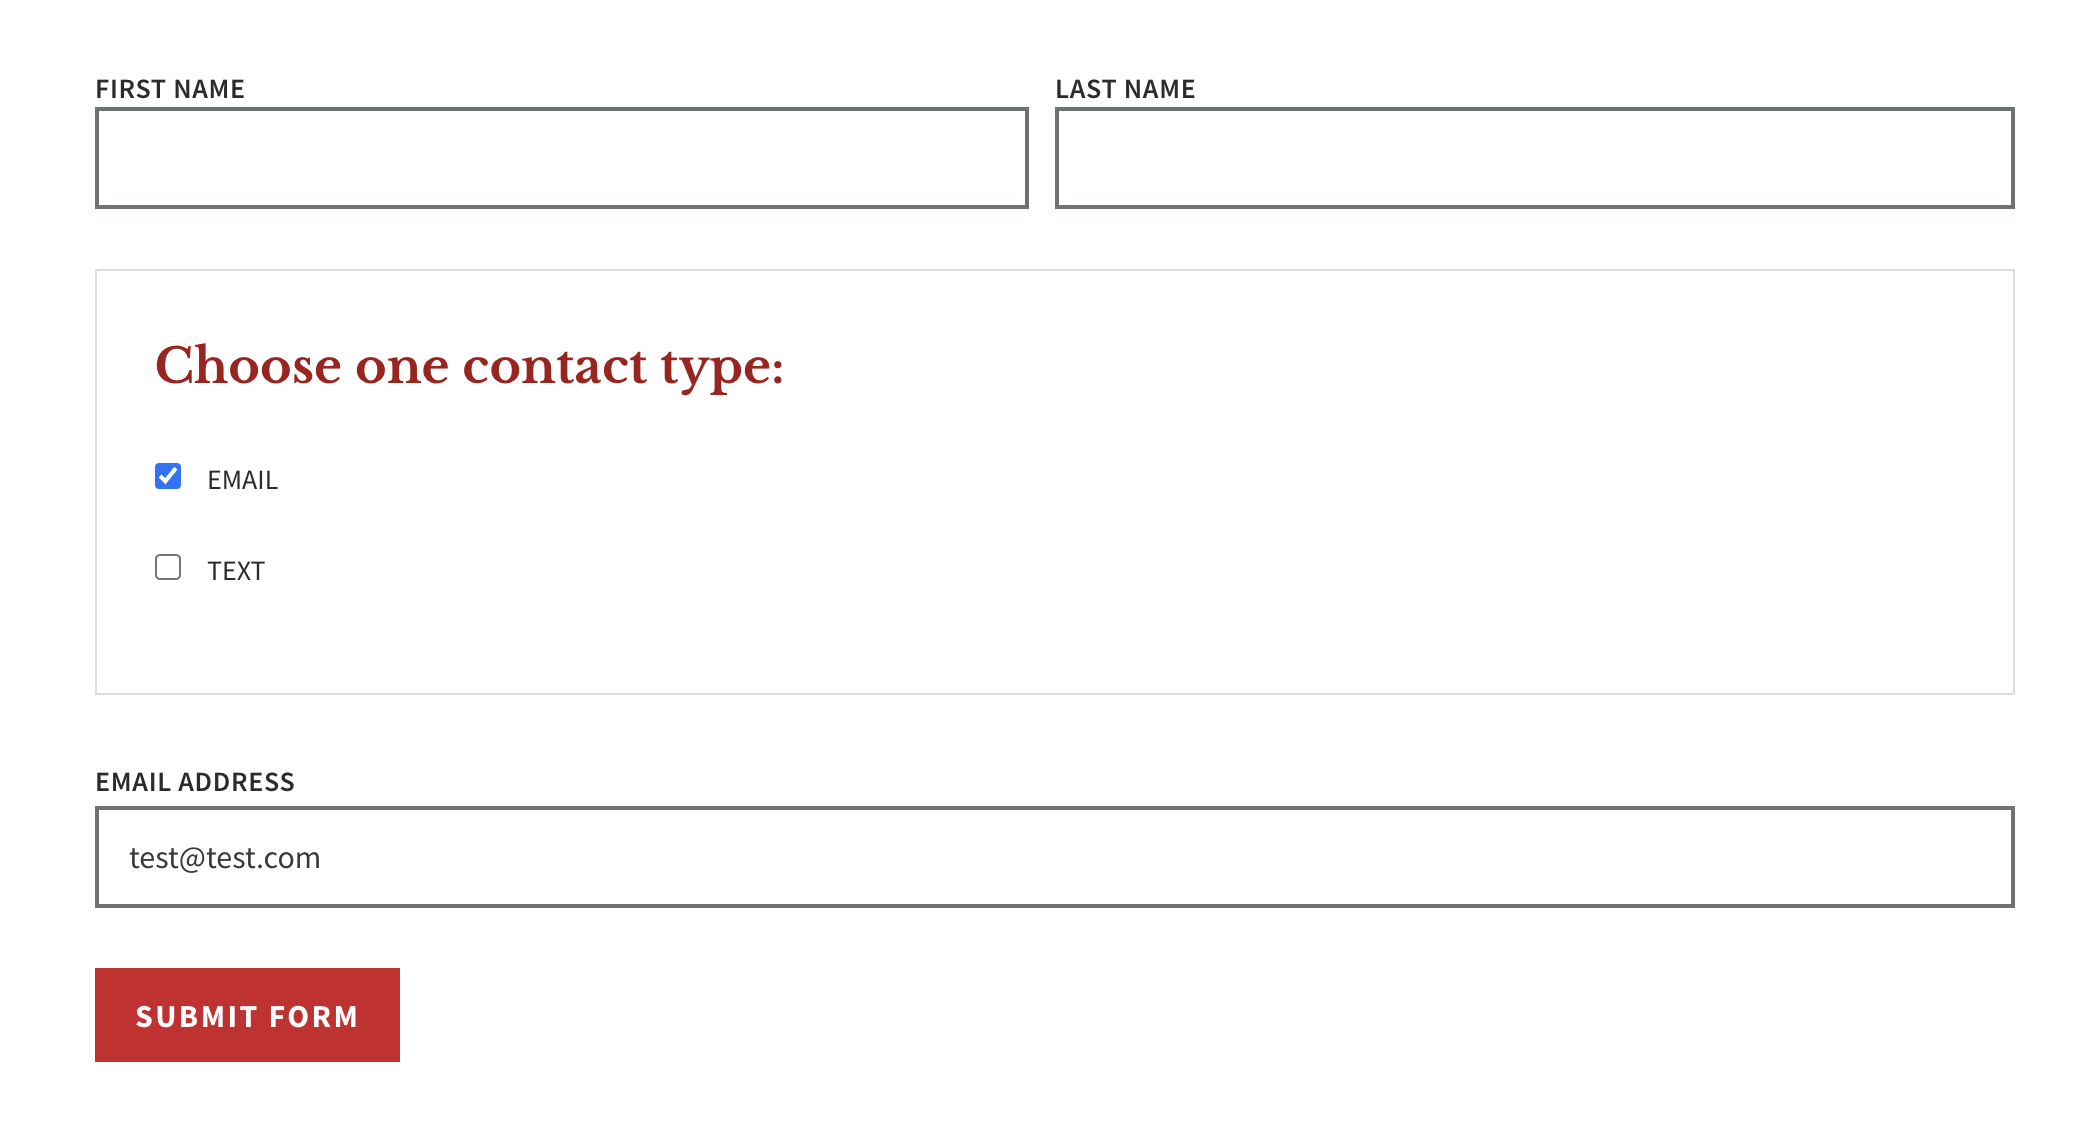
You can trigger fields, pages, and fieldsets to display conditionally based on the values that someone filled out on the form.
For example, if you have a form asking someone to choose text or email as a preferred contact method, you can trigger a phone number field or email field to appear based on which option they choose.
To create a conditional statement for this example:
1. Create an element that will determine what the visitor sees. In this case, you will need an options element with two checkboxes, one labeled 'text' and the other labeled 'email'.
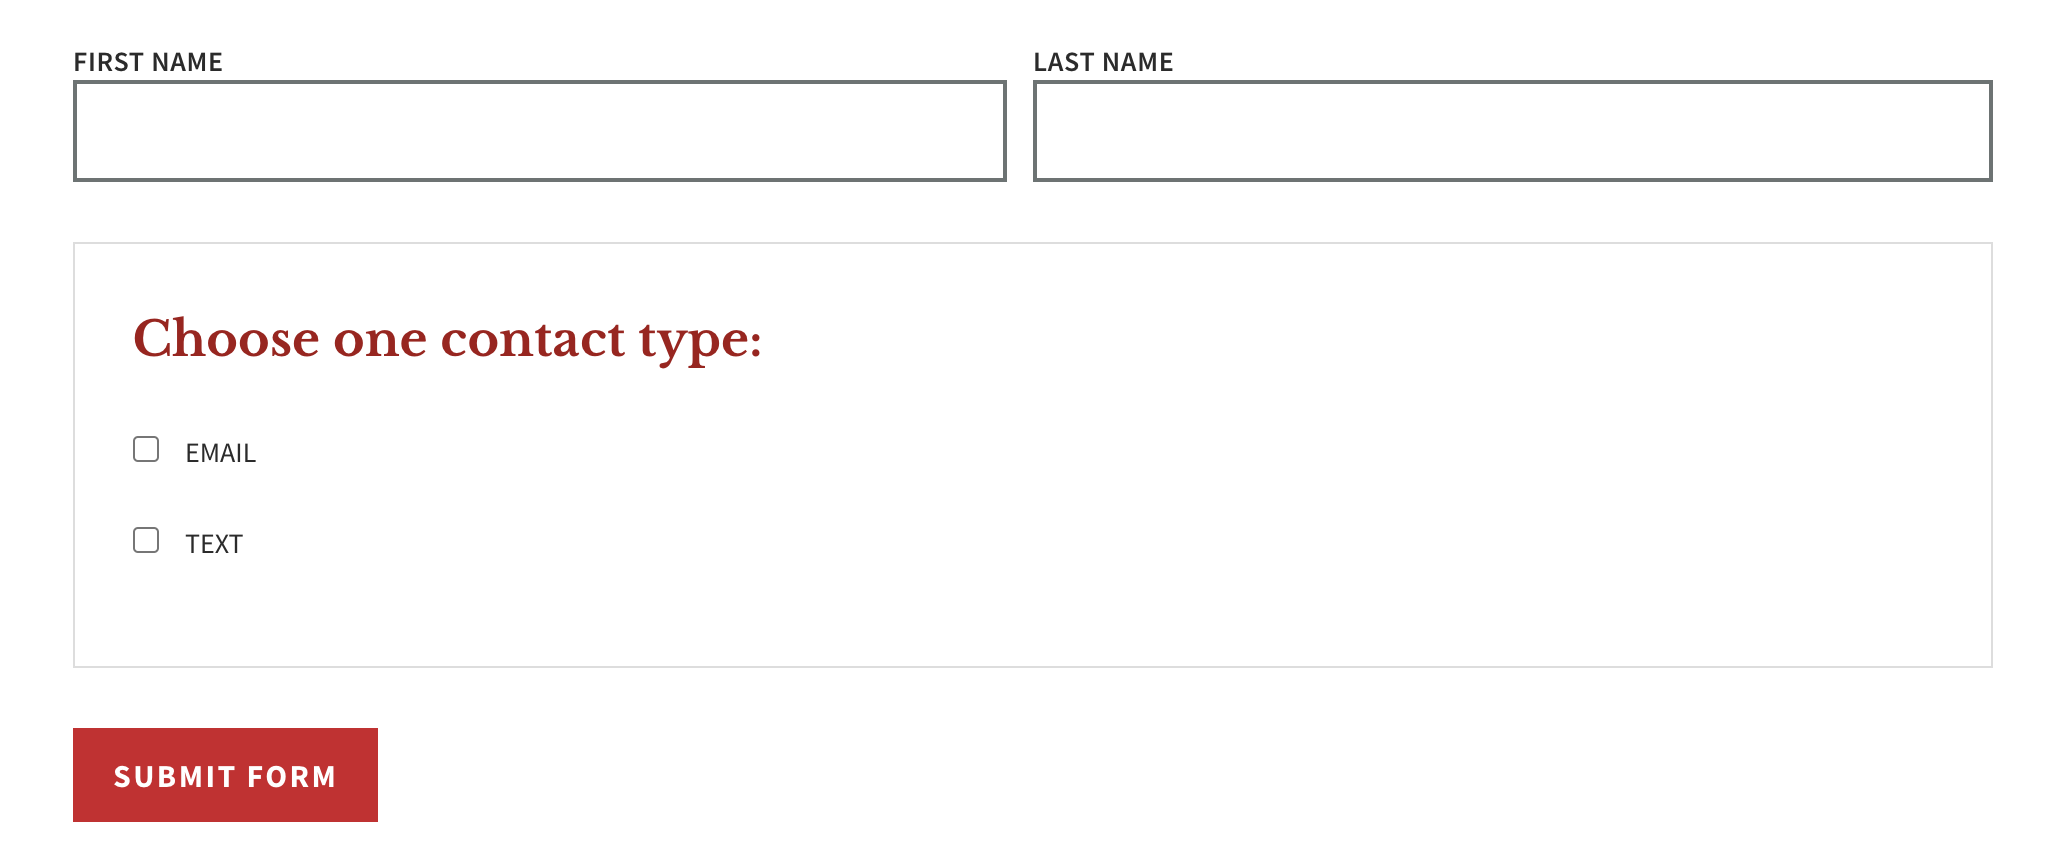
2. Add two more elements after your checkboxes, one for an email address and one for a phone number. These are the two conditional elements since they will only display under certain conditions.
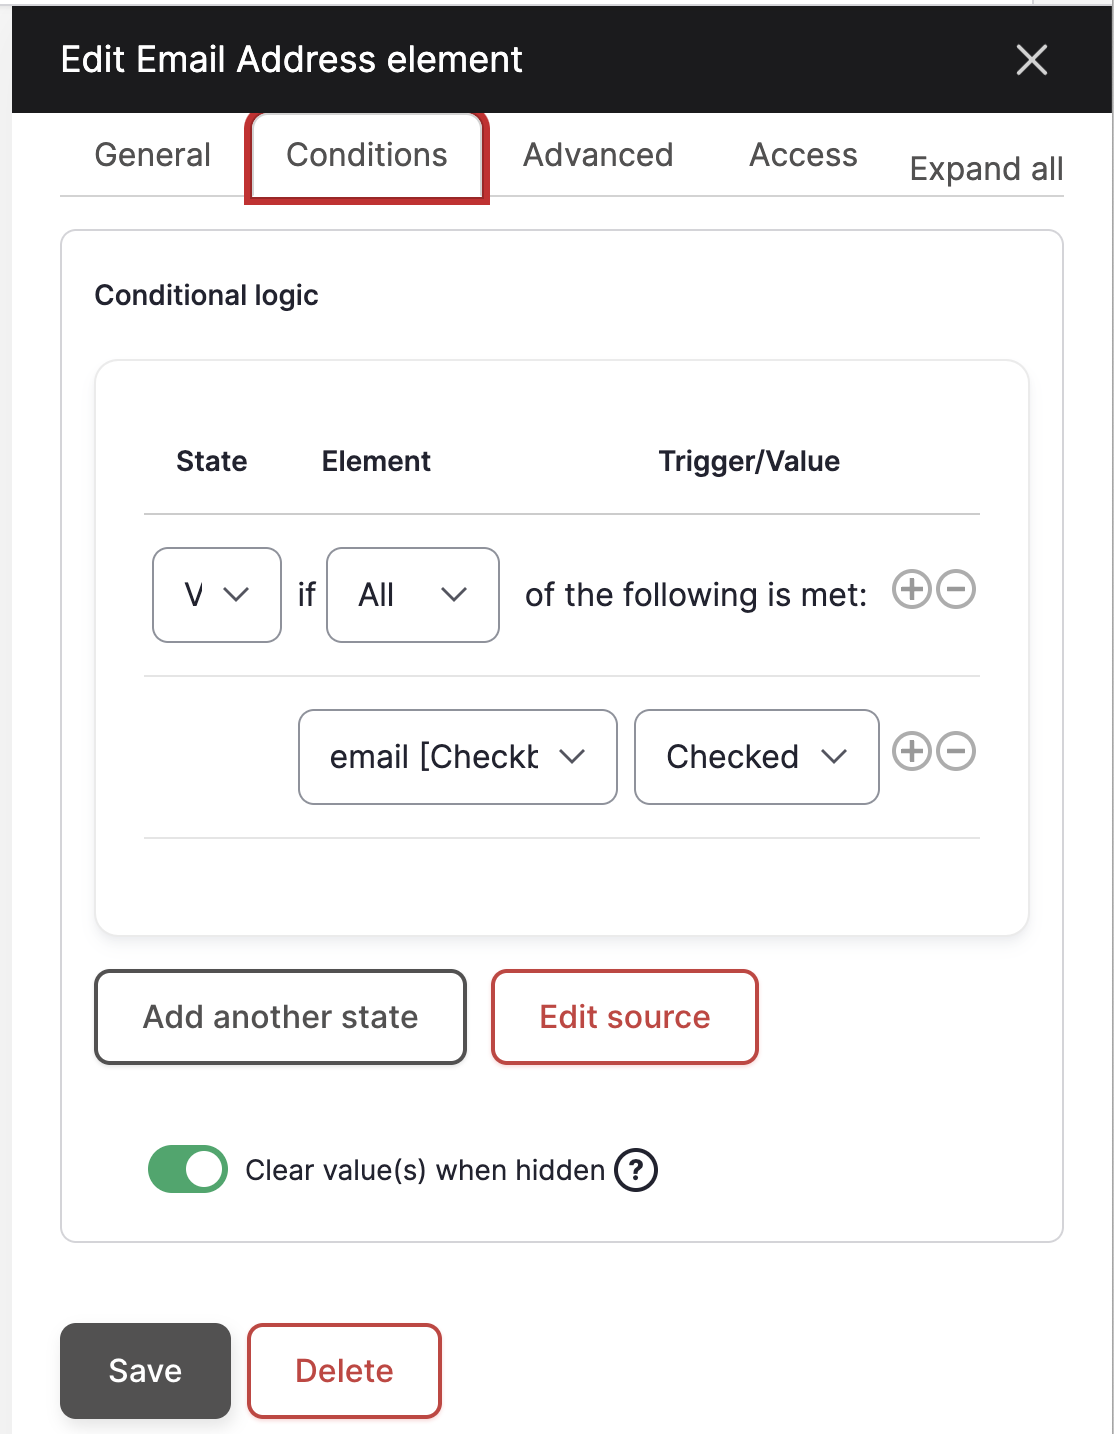
3. While in 'build' mode, click 'edit' next to your email address field and then choose the 'conditions' tab.
4. You will need to choose the following options in the State, Element, and Trigger/Value dropdowns:
- State: visible
- Element: one
- Trigger: email-checkbox
- Value: checked
This translates into the email address field should be visible if the email checkbox is checked.
5. Save your conditionals.
6. You will now need to go to the phone number field and choose the same conditionals:
- State: visible
- Element: one
- Trigger: text-checkbox
- Value: checked
This translates into the phone number field should be visible if the text checkbox is checked.
7. Save your conditionals
8. Save your form
9. When you test your form, neither the email address or phone number fields should be visible until you check their corresponding check boxes.
Adding Comments or Data to Webform Submissions
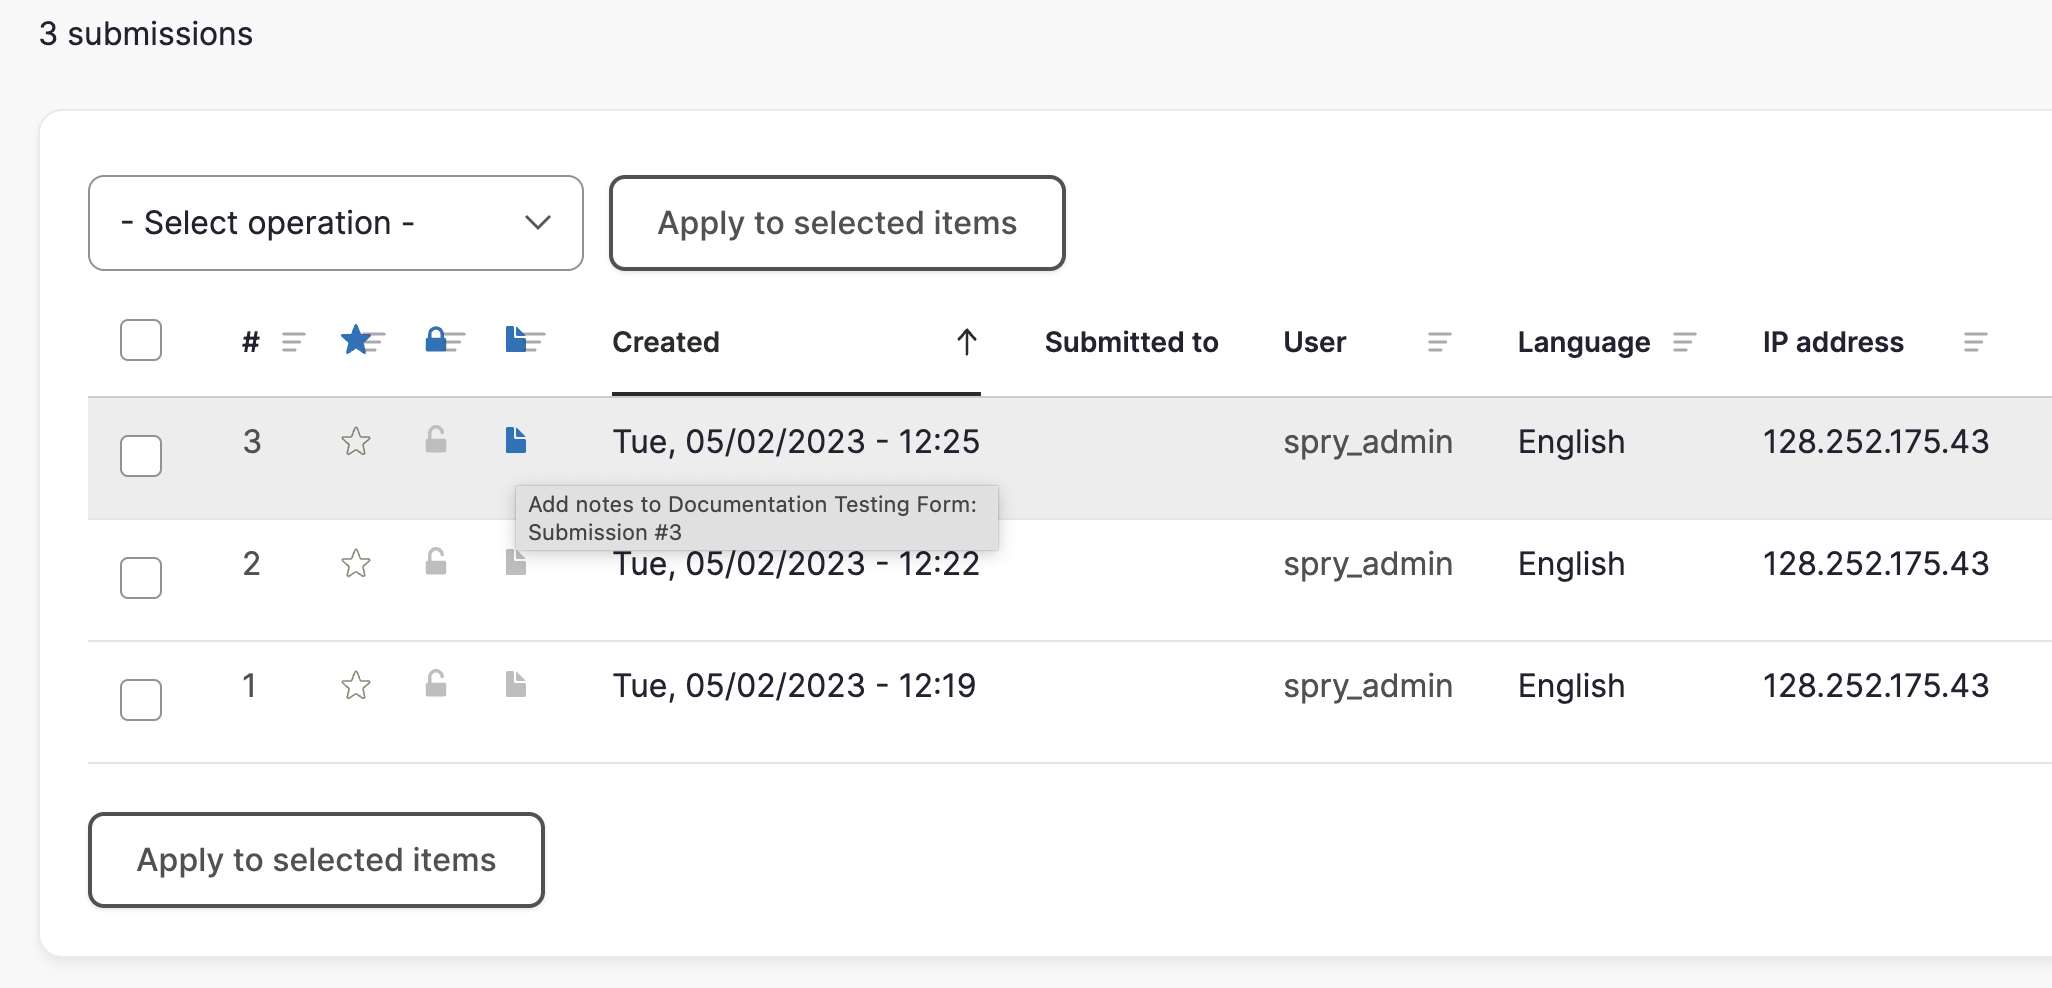
If you would like to add a comment or data to webform submissions, you can do so by going to the webform results page and then choosing the submissions tab.
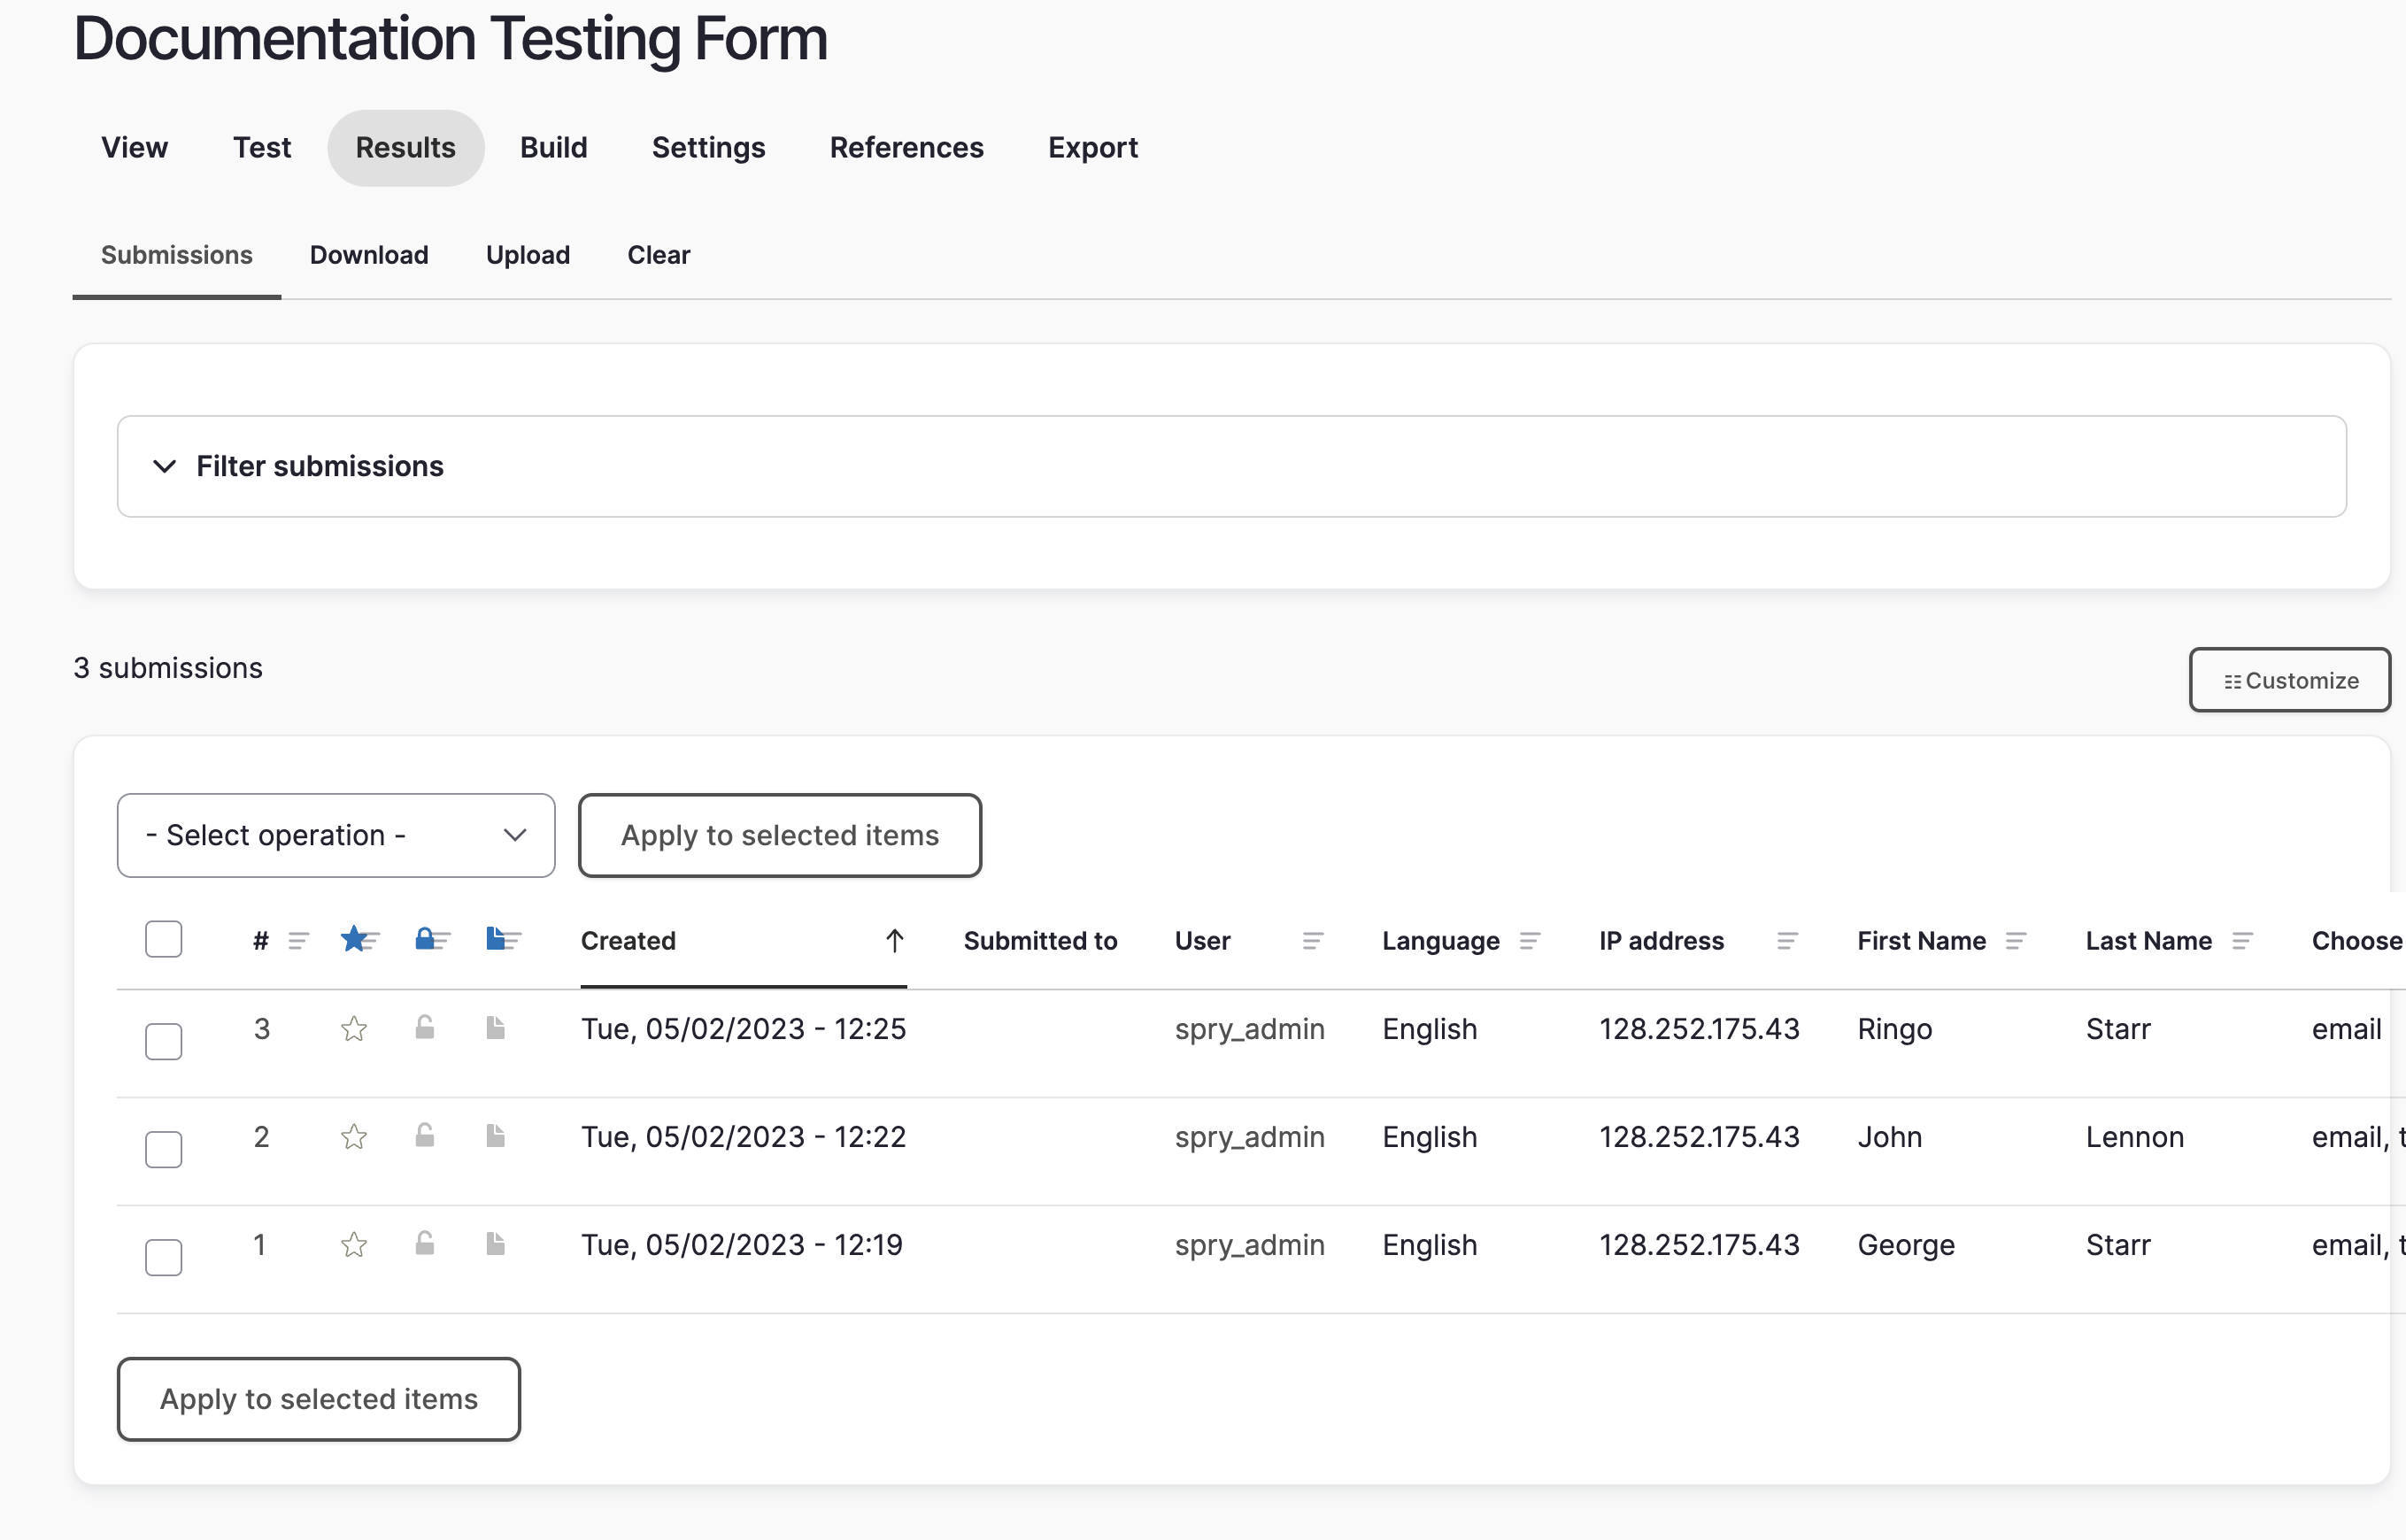
Once there, click on the paper icon next to a submission. This will open a popup window and allow you to add notes or data to the submission. There are also options to lock a submission or star/flag submissions.
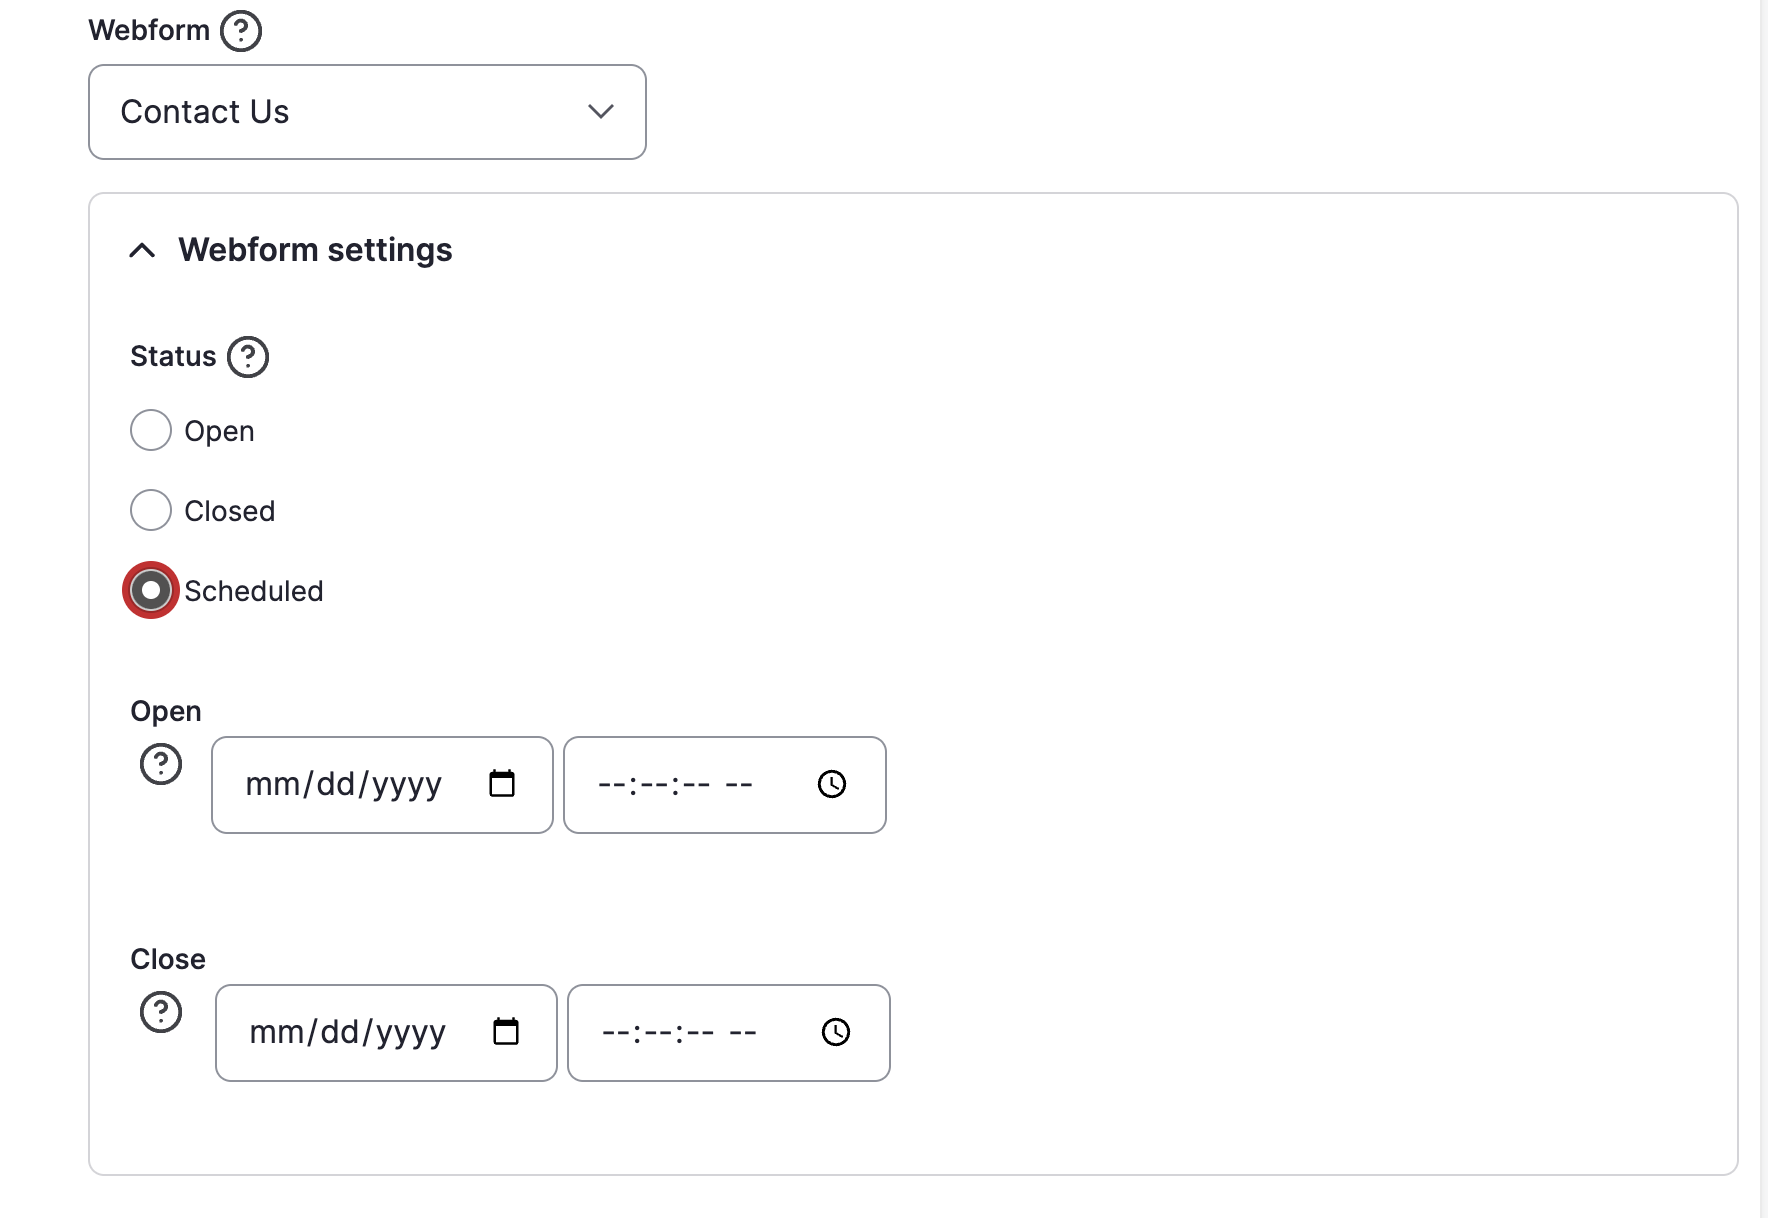
Opening, Closing, and Scheduling a Webform to Automatically Unpublish
Opening, Closing, and Scheduling a webform to automatically unpublish:
- Go to your Webform management page and select a webform.
- Once you click on the title, navigate to the 'settings' tab.
- Choose the 'form' option.
Now you can open, close, or schedule your form.
Opening, Closing, and Scheduling Webforms pulled into Events and the Contact Landing page:
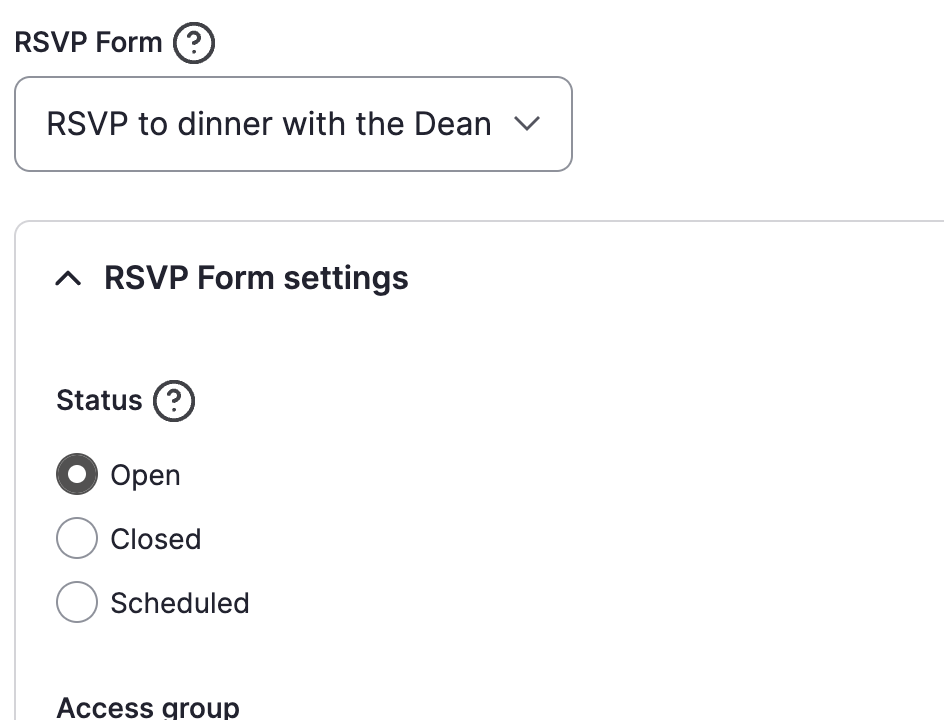
If you pull a webform into an Event as an RSVP or in the Contact Landing page as a Contact Us form, you will have the opportunity to schedule the webform to automatically unpublish. Once you choose which form you will use from the dropdown, the webform setting options will open. At this point, you can set it to be open, closed, or can schedule to open and close on scheduled dates. We highly encourage you to close your RSVP forms once the event is over to help reduce webform spam submissions.
Enabling file uploads to Box
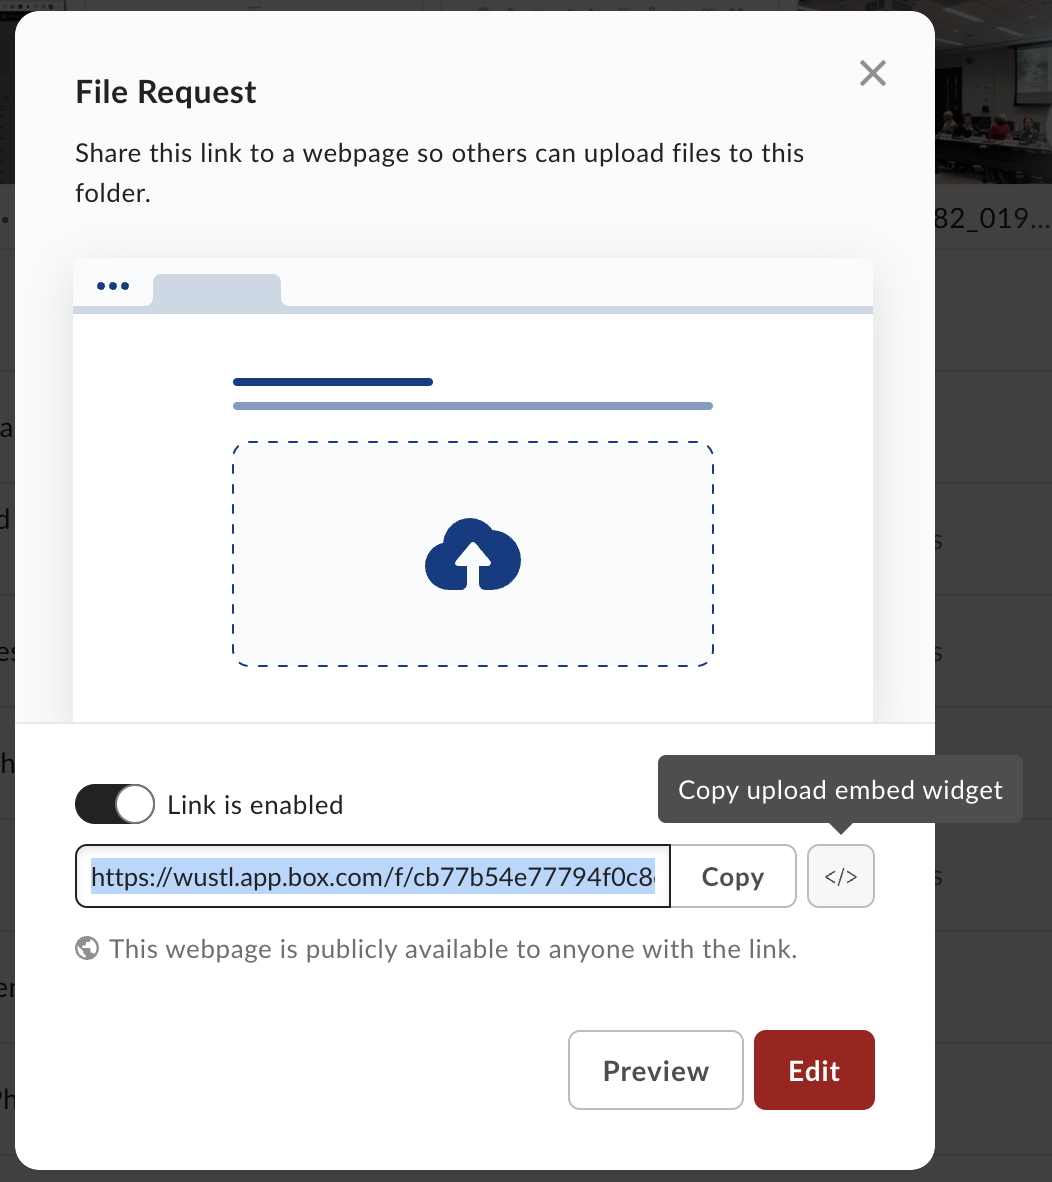
First, log into Box
- Create a folder in Box
- Click the ellipses to see options and select "File Request." A smaller window will open.
- Select any customizations.
- Next to the URL, click the "Copy upload embed widget" button.
5. Next, go to the Build tab in your webform and click the +Add Element button.
6. In the Markup Elements section, choose the 'Advanced HTML/Text' option and click the 'add element' button which will trigger a popup to open.
7. On the WYSIWYG in the popup, change the text format dropdown from Full HTML to Plain Text.
8. Copy/Paste the embed widget code and save.
Edit the text and options that display inside the box upload iframe
To change the text that appears inside the box upload iframe, you’ll need to edit in box. Here are the steps:
1. Log into box and navigate to view the folder you want to change.
2. Mouse over the ellipses to see more options and select “File Request”
3. A small window will open, click the “Edit” button on the lower right.
4. Make any changes and then save. You should see those changes reflected in the iframe on your website right away (no need to re-copy/paste the code) – if not, reload the page in your browser.
Here is more information about file request options in box: https://support.box.com/hc/en-us/articles/360045304813-Using-File-Request-to-get-Content-from-Anyone
Webform Results
Customizing the Webform Confirmation Message
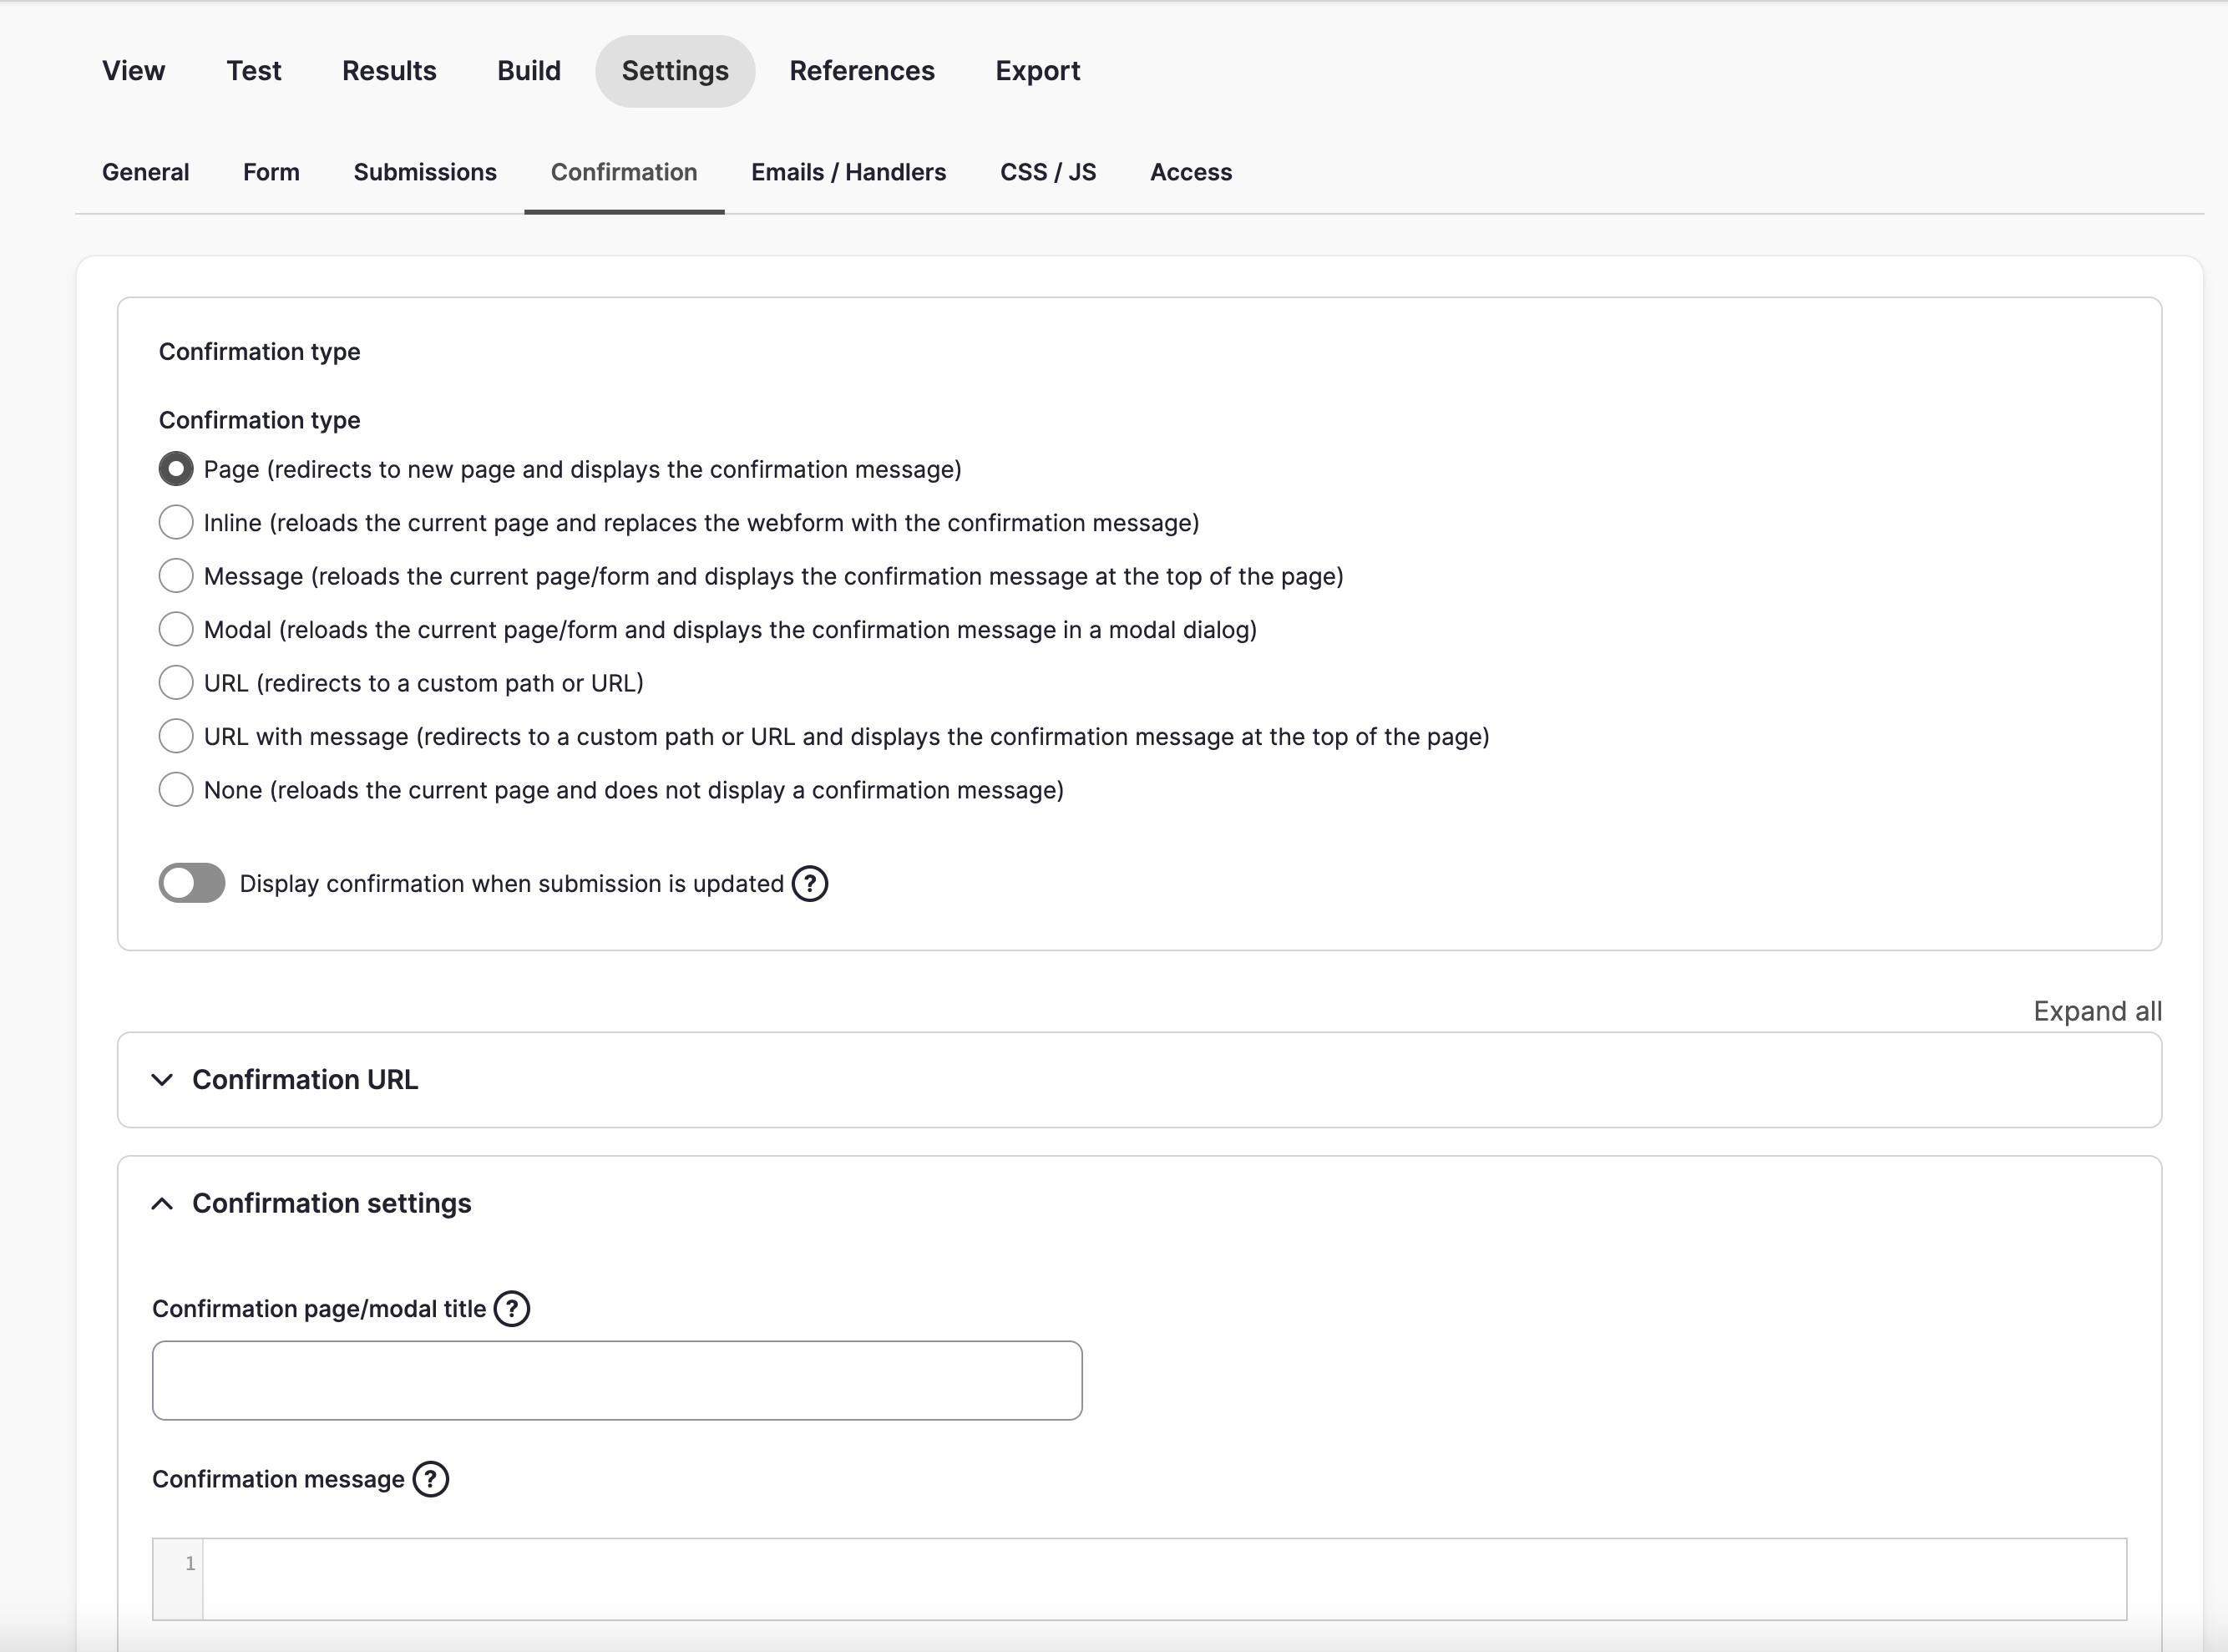
- Go to your Webform management page and select a webform.
- Once you click on the title, navigate to the 'settings' tab.
- Choose the 'confirmation' option.
- Choose what type of confirmation you would like to use on this webform.
- Under Confirmation Settings, enter your confirmation message in the confirmation message field.
- Save the page.
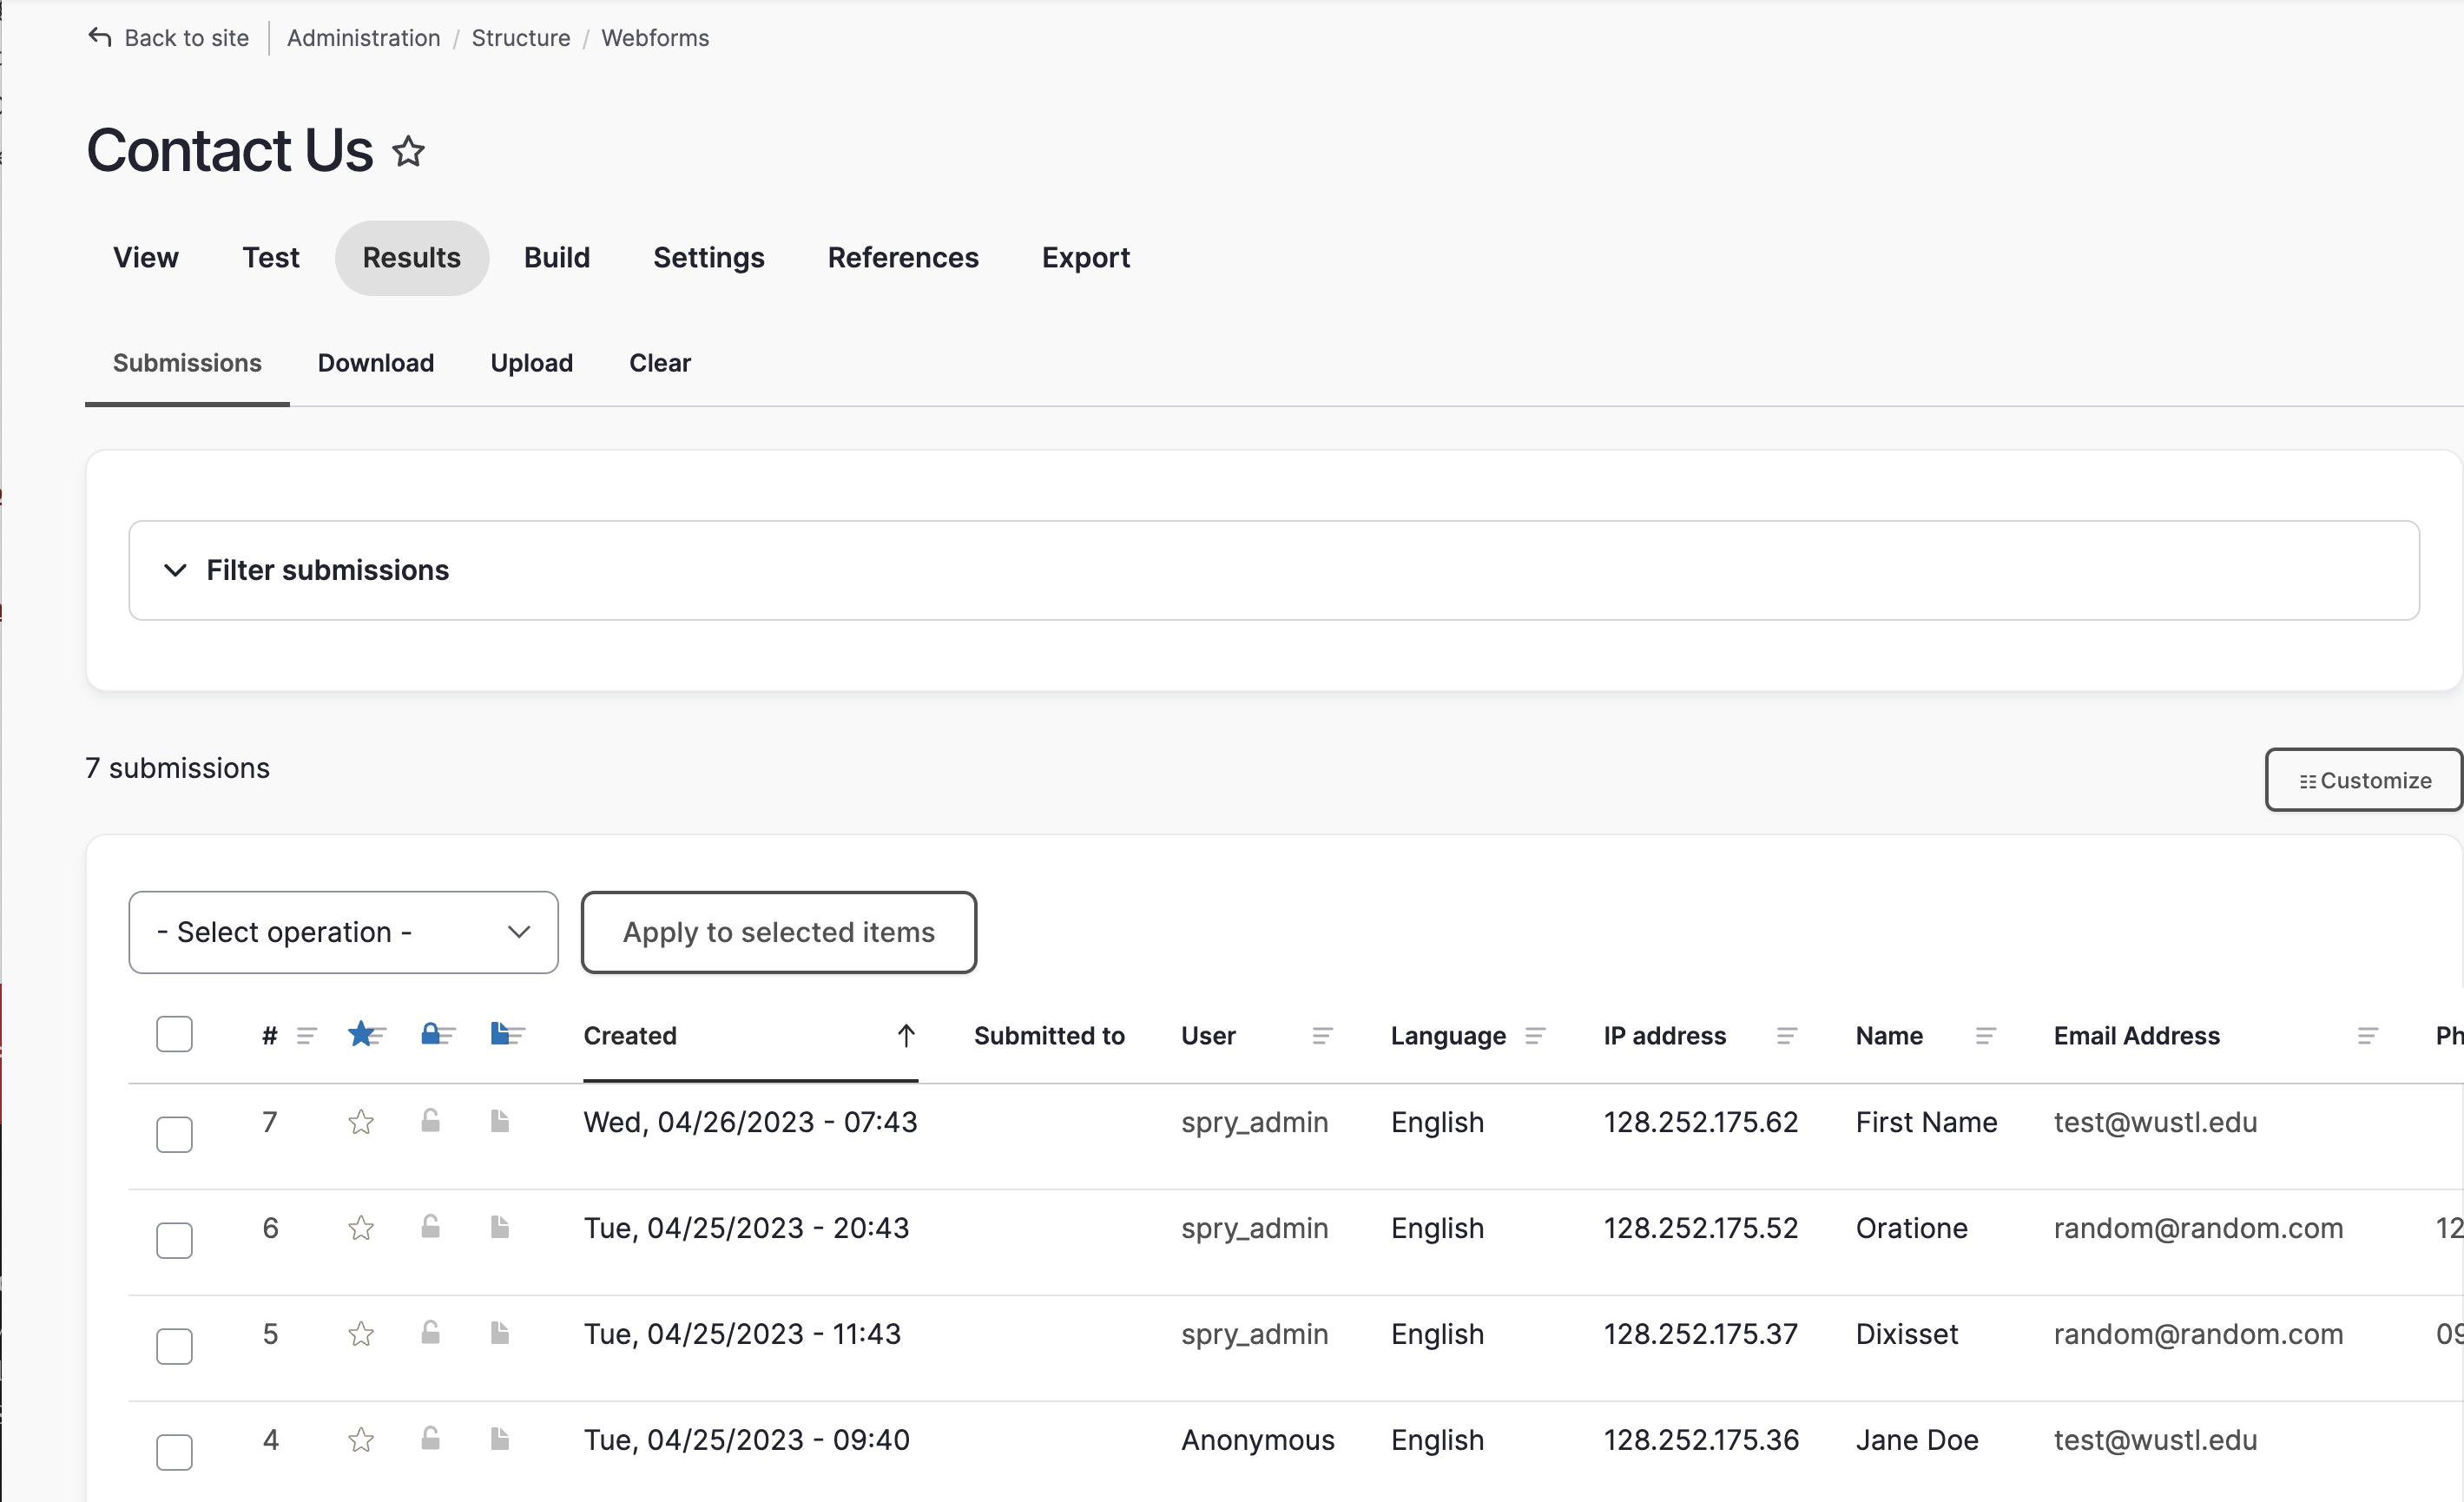
Accessing Form Results
- Go to your Webform management page and select a webform.
- Once you click on the title of the webform, navigate to the 'results' tab.
- From here, you will be able to download or export your results, lock, sort, delete, and add notes to the submissions.
Email your Form Submissions
This allows you to have a copy of the form submission emailed to someone.
- Go to your Webform management page and select a webform.
- Once you click on the title, navigate to the 'settings' tab.
- Choose the 'emails/handlers' option.
- Click +add email button. This will open a popup and allow you to add an email handler.
- In the 'send to' section, choose 'custom to email address' option in the 'send to' dropdown.
- Enter the email address of the person who should receive the form submissions. You can add multiple addresses and/or have other people cc'd.
- Save.

Email a copy of the form submission to the user who filled it out
This can be useful when you are asking for RSVPs or in any case where you want the form filler to be reminded of what they submitted.
- Go to your Webform management page and select a webform.
- Once you click on the title, navigate to the 'settings' tab.
- Choose the 'emails/handlers' option.
- Click +add email button. This will open a popup and allow you to add an email handler.
- In the 'send to' section, choose 'Elements: email address' option in the 'send to' dropdown. This will send a copy of the submission to the email address the user enters into the email field on the form.
- Save

Helpful Hints for Webforms
Best Practices
- Close your form when you are not actively seeking submissions. Not in use? Help prevent spam by closing your form under webform->form settings.
- Do not allow users to submit the form if they are not eligible. (e.g. Close the form when an application period is over or when you are no longer accepting survey responses.)
- Keep it short.
- Group related fields together visually by using Markups. (e.g. contact information)
- Put all required fields at the top together.
- Use specific options instead of open-ended text boxes wherever possible. (Less work for your users!)
- Make the length of the text box or text area reflect the content. For example, the box for a 6-character ID should only be 6 characters wide.
Captchas & Spam Discouragement
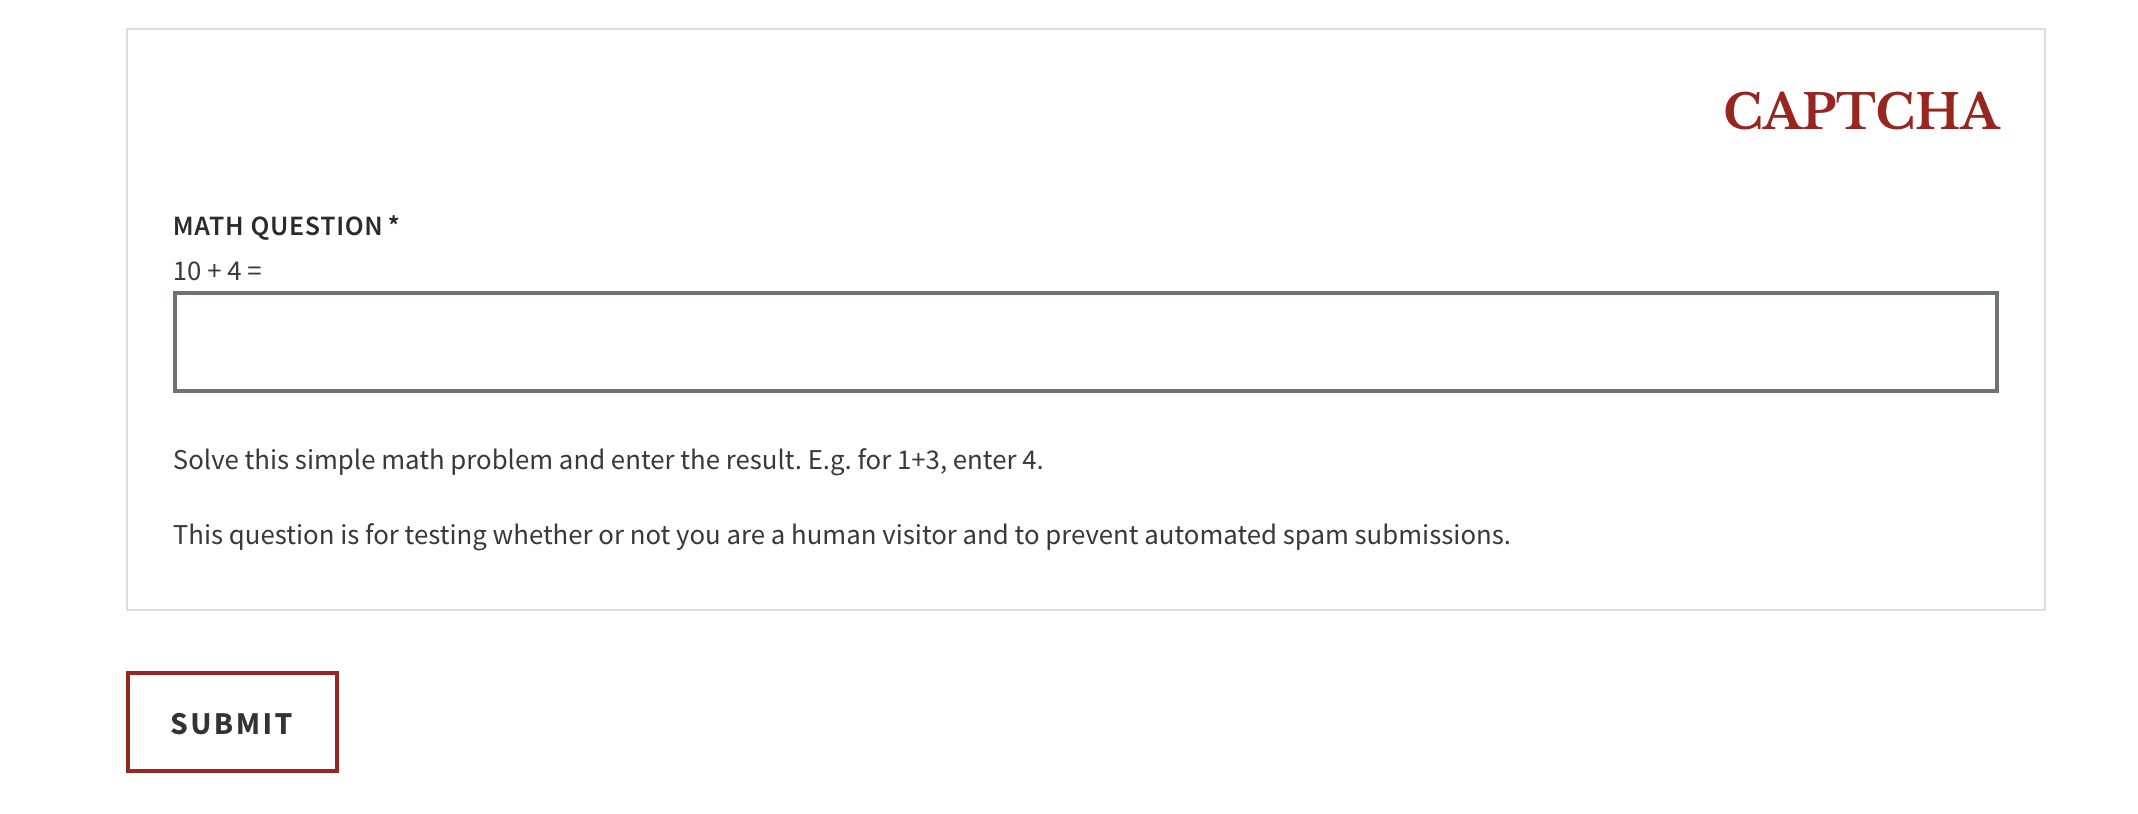
Captchas:
All webforms will automatically add a required captcha to the bottom of your web form so you will not have to add them manually. If you would like to see what the captcha looks like, view your webform in an Incognito window in Google Chrome (File > New Incognito Window).
Honeypot:
Honeypot is a feature that sets the minimum time required before a form should be considered entered by a human instead of a bot. Like captchas, this feature is automatically included on all webforms.